Horsepower and Torque: Understanding Key Engine Performance Terms

Image illustrating a guide to understanding horsepower and torque for better car knowledge

Torque measures rotational force that gets vehicles moving from standstill, whereas horsepower represents the rate of work over time that maintains speed. Think of torque as the initial push and horsepower as sustained power at higher speeds. Mathematically, horsepower equals torque multiplied by RPM divided by 5,252. Different vehicles prioritize these forces based on purpose—trucks need torque for towing, sports cars need horsepower for speed. Understanding both reveals why certain vehicles perform the way they do.

The Basic Physics Behind Horsepower and Torque

Why do cars sport two different power measurements? It’s because they represent distinct aspects of engine performance.

Torque measures the rotational force produced by an engine—the twisting effect that moves your vehicle from a standstill. Measured in pound-feet or Newton-meters, it’s what you feel pushing you back in your seat during acceleration.

Torque: the invisible hand that presses you into your seat when you hit the gas pedal. Horsepower, nonetheless, calculates how quickly work gets done, derived from the formula:

Horsepower = (Torque × RPM) ÷ 5252.

This measurement reveals the engine’s sustained power output at speed. The torque curve shows how force varies across different RPM ranges, whereas horsepower peaks at higher revolutions.

In the horsepower versus torque debate, both matter: torque launches you forward, whereas horsepower keeps you moving fast. Additionally, just as ISO hydraulic oil protects complex hydraulic systems by ensuring outstanding performance and protection under extreme conditions, both torque and horsepower are essential for a vehicle’s overall efficiency and endurance.

How Horsepower Affects Vehicle Performance

Horsepower directly influences a vehicle’s top speed capabilities, with higher ratings enabling greater maximum velocities as demonstrated by performance vehicles like the 717 hp Dodge Challenger Hellcat. This raw power output determines how effectively a vehicle can maintain high speeds and overcome air resistance at velocity.

Making horsepower vital for highway performance and racing applications. The relationship between a vehicle’s weight and available horsepower (weight-to-power ratio) fundamentally dictates real-world acceleration response and speed potential across driving conditions. In high-performance vehicles, DOT 4 brake fluid ensures superior braking power and control, complementing the engine’s output effectively.

Speed vs. Acceleration Dynamics

When discussing vehicle performance, distinguishing between acceleration and top speed capabilities reveals the critical role of horsepower. While initial acceleration depends heavily on torque, maximum power determines how quickly a vehicle can continue gaining speed once in motion.

A vehicle’s engine generates increasing horsepower as engine RPM rises, enabling sustained acceleration at higher speeds where torque alone becomes insufficient.

This explains why high-horsepower vehicles excel in highway passing and racing scenarios rather than just off-the-line starts. The relationship between power and acceleration becomes particularly evident when comparing vehicles with similar weight but different horsepower ratings.

Acceleration dynamics confirm that horsepower ultimately governs top speed potential, as it represents the engine’s ability to overcome air resistance at velocity.

For peak performance, engineers balance horsepower and torque across the entire engine speed range.

Top-End Performance Potential

The upper limits of a vehicle’s performance capabilities directly connect to its horsepower rating. While torque determines initial acceleration, horsepower becomes the dominant factor in achieving impressive maximum velocities. Performance vehicles like the Challenger Hellcat demonstrate how 717 hp translates to speeds exceeding 200 mph, showcasing the relationship between engine power and top-end speed.

Vehicle Model Horsepower Peak RPM Top Speed
Dodge Hellcat 717 hp 6000 rpm 200+ mph
Camaro ZL1 650 hp 6600 rpm 190 mph
Mustang GT 460 hp 7000 rpm 155 mph
Civic Type R 306 hp 6500 rpm 169 mph

>Horsepower ratings reveal a vehicle’s performance potential at high engine RPM, where sustained power delivery becomes essential. Unlike torque’s role in initial acceleration, high-speed performance depends on the engine’s ability to maintain power output at elevated speeds.

Weight-to-Power Considerations

A vehicle’s performance capabilities extend beyond raw power numbers, as the critical relationship between weight and horsepower finally determines real-world performance outcomes. This fundamental principle is captured in the power-to-weight ratio—a key metric for evaluating vehicle performance potential.

When an engine produces high horsepower in a lightweight chassis, vehicles can accelerate quickly and maintain higher speeds efficiently. Performance vehicles capitalize on this relationship by maximizing horsepower and minimizing weight.

Unlike heavier vehicles where both torque and horsepower are needed for towing, lightweight sports cars prioritize power-to-weight advantages.

Weight-to-power considerations explain why a 300-horsepower sports car might outperform a 400-horsepower SUV on a racetrack. For enthusiasts seeking ultimate performance, the balance between power and torque must be optimized relative to the vehicle’s weight class.
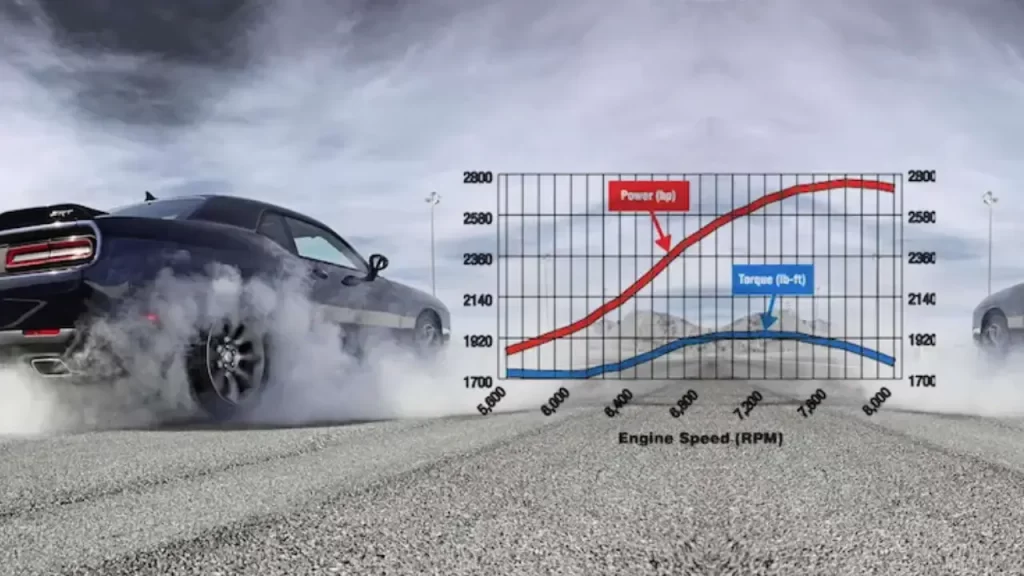
engine power and torque metrics representation

Why Torque Matters for Acceleration and Towing

Why does torque receive so much attention when discussing vehicle capabilities? Torque represents the rotational force that delivers the vital initial push needed to set a vehicle in motion. With high torque available at low RPM, vehicles can accelerate more responsively from a standstill and handle heavy loads with confidence. Additionally, the superior lubrication and protection provided by high-quality engine oils can enhance overall vehicle performance.

Torque Benefit Real-World Impact
Strong initial acceleration Quicker off-the-line performance
Greater towing capacity Ability to pull 12,200+ lbs trailers
Better low-end power Less strain when climbing hills
Improved off-road capability Freedom to conquer difficult terrain
Enhanced everyday drivability Responsive performance in traffic

>Peak torque output directly influences a vehicle’s towing capabilities, making torque figures essential for those seeking the liberation of hauling boats, trailers, or equipment without compromise.

The Mathematical Relationship Between Power and Torque

The mathematical relationship between horsepower and torque is expressed through the formula HP = (Torque × RPM) ÷ 5,252 for pound-feet measurements. This equation reveals that horsepower is fundamentally torque multiplied by rotational speed, then scaled by a constant factor determined by the units used.

Performance numbers demonstrate that even with constant torque, increasing engine speed proportionally increases power output, explaining why high-revving engines can achieve impressive horsepower figures in spite of modest torque ratings.

How Equations Work

Understanding the mathematical relationship between horsepower and torque requires exploring their fundamental equation that connects these two essential measurements. The horsepower equation expresses this quantitative relationship as HP = (T × RPM) / 5,252 for pound-feet, or HP = (T × RPM) / 7,127 for newton-meters.

This formula reveals how engine power calculation depends on both rotational force and speed. At constant torque, increasing RPM creates proportional gains in horsepower.

The horizontal power curve demonstrates why peak torque vs peak horsepower typically occur at different engine speeds. Although torque measures the twisting force, horsepower represents how quickly that force can be delivered.

The torque formula explains why two engines with identical torque but different RPM characteristics will produce vastly different power outputs—highlighting why units of measurement and mathematical understanding are essential for proper vehicle performance evaluation.

Calculating Performance Numbers

Calculating performance numbers reveals the precise mathematical relationship that ties horsepower and torque together as interrelated yet distinct measurements.

Engineers and enthusiasts use the formula Horsepower = (Torque × RPM) ÷ 5252 to understand how these forces interact within an engine’s power delivery.

  1. Peak power occurs at the specific RPM where the torque-RPM product reaches its maximum value when divided by the constant 5252.
  2. Engines with identical torque numbers can produce vastly different horsepower figures depending on their operational RPM range.
  3. The horsepower vs torque relationship explains why high-revving engines can achieve substantial power despite moderate torque.
  4. Performance calculations allow engineers to optimize engines for specific applications by determining where in the RPM band to maximize either torque or horsepower.

Gas vs. Electric: Different Power Delivery Systems

When comparing gas engines to electric motors, fundamental differences in power delivery systems particularly impact vehicle performance.

Gas engines build torque gradually, requiring high RPM to reach their power potential, with peak torque typically arriving at mid-range engine speeds. This characteristic necessitates gear changes to maintain ideal performance zones.

Electric motors, conversely, deliver instant torque from zero RPM, creating remarkable linear acceleration without waiting for engine speeds to climb. Their power delivery system remains consistently available, eliminating the need for traditional transmission shifting.

The torque curve in electric vehicles is practically flat and reaches maximum output immediately, unlike the variable curve of combustion engines. This instant power translates to quicker off-the-line response, despite what traditional horsepower numbers might suggest on specification sheets. Additionally, the use of premium diesel engine oil can greatly enhance the longevity and lubrication efficiency of gas engines, improving their performance.

Practical Applications: Choosing the Right Power Profile

Selecting the appropriate power profile for a vehicle depends critically on its intended purpose and operating conditions.

The distinction between horsepower vs torque makes all the difference in how a car accelerates and performs in various situations. Higher torque at low RPMs separates an ordinary engine from a good one when specific tasks are required.

  1. Towing vehicles prioritize torque makes – diesel trucks with 460 lb-ft torque can haul 12,200 lbs effortlessly.
  2. Sports cars emphasize the power produced by the engine at high RPMs – Hellcats with 717 hp achieve impressive top speeds.
  3. Off-road vehicles require substantial torque at low ranges for conquering steep terrain.
  4. Electric vehicles like Tesla’s Model S Plaid demonstrate what power an engine can produce instantly, delivering both acceleration and efficiency. Additionally, proper maintenance using Motorcycle Fork Oil can significantly improve performance and handling in various vehicles.

High Torque vs. High Horsepower: Which Matters Most?

The age-old debate between high torque and high horsepower continues to influence vehicle purchasing decisions across various segments. The answer ultimately depends on intended use: high torque provides immediate pulling power at lower RPMs, making it crucial for towing heavy loads or conquering off-road terrain.

The amount of torque available, especially in the lower power band, determines how effectively a vehicle can accelerate from standstill.

Conversely, high horsepower measures a vehicle’s ability to maintain speed, becoming most relevant at higher RPM ranges. Performance enthusiasts often seek vehicles with balanced compression and torque capabilities that deliver across the entire power band.

Modern engineering increasingly focuses on achieving both peak torque at low RPM and substantial horsepower at higher RPM, creating versatile vehicles that excel in various driving conditions. Additionally, the use of premium motor oil can enhance engine performance, ensuring optimal functionality across different RPM ranges.

Conclusion

Understanding the distinction between horsepower and torque enables better vehicle selection based on specific needs. Whereas torque provides the initial force for acceleration and towing capacity, horsepower determines top-end speed and sustained performance. Their mathematical relationship reveals their complementary nature across different engine types. In the end, the ideal balance depends on intended use—whether hauling heavy loads or achieving high-speed performance.

Remember that proper maintenance, including regular oil changes with high-quality lubricants, is essential for maximizing engine lifespan, reducing friction, and minimizing wear. Explore Armor Lubricants’ range of engine oil manufactured in UAE designed to protect your engine.


How to Check Power Steering Fluid and When to Change It?

guide to check and change power steering fluid

Checking power steering fluid requires locating the reservoir near your vehicle’s wheels and examining fluid levels between the MIN/MAX markers. Look for clear, pink or amber fluid with no debris or burnt smell. Most vehicles need fluid changes every 30,000-50,000 miles or 2-4 years. Warning signs include whining noises, steering difficulty, or visible leaks.

Regular inspection prevents expensive steering system damage. The proper maintenance techniques below will extend your vehicle’s steering life.

Locating Your Vehicle’s Power Steering Fluid Reservoir

The power steering fluid reservoir is a critical component that requires regular inspection to guarantee proper steering function. This container is typically a small, clear plastic vessel with a black cap, allowing drivers to easily check the fluid level without special tools.

To locate the power steering fluid reservoir, look near one of the vehicle’s wheels, though exact positioning varies by make and model.

Look for your power steering reservoir near a wheel, remembering that location differs across vehicle types.

The reservoir typically features MAX and MIN indicators on its exterior for accurate assessment of the car’s power steering system fluid status.

If the reservoir proves difficult to find, consult the owner’s manual for specific guidance.

Before checking the vehicle’s power steering fluid, wipe the area surrounding the cap clean to prevent contamination when opened, ensuring the system remains free of damaging debris. Additionally, using a fluid with superior performance and reliability can help maintain the overall efficiency of the steering system.

Step-by-Step Process to Check Power Steering Fluid Levels

Properly checking power steering fluid requires finding the reservoir location, which varies by vehicle make and model but is typically marked with distinctive coloring or symbols.

Temperature conditions affect fluid reading accuracy, with many manufacturers recommending checks when the system is either hot after driving or cold after sitting overnight.

The reservoir typically features clear MIN/MAX indicators, sometimes on a dipstick attached to the cap, which serve as reference points for determining if fluid levels are adequate.

Locating Reservoir Position

Finding the power steering fluid reservoir is the initial step in checking fluid levels accurately. This component is typically a translucent plastic container with a black cap, strategically positioned in the engine bay, often near one of the wheels.

  • Consult your vehicle’s manual to locate the power steering fluid reservoir, as positions vary markedly between different makes and models.
  • Ensure the engine is off and cool before attempting to check the level to prevent potential burns.
  • Clean the exterior of the container to keep debris from contaminating the power steering system when opened.
  • Examine the reservoir for MIN/MAX indicators on its exterior, or use the dipstick attached to the cap by removing it, wiping clean, and reinserting to determine if fluid replenishment is necessary.

Hot vs. Cold Checks

Determining whether to check power steering fluid when the engine is hot or cold makes a significant difference in obtaining accurate readings. Most manufacturers recommend checking the fluid level at when the engine is at operating temperature for precision.

To perform a hot check, start the engine and turn the steering wheel fully in both directions to circulate and warm the fluid. After warming, turn off the engine and let the vehicle sit for a few minutes before checking. Use the dipstick or reservoir markings to ascertain the fluid remains within the recommended range for hot fluid.

Some vehicles specify different proper temperature conditions for inspection. Always consult your vehicle’s manual to confirm whether a hot or cold check is appropriate for your specific power steering system.

Understanding Level Indicators

Power steering fluid level indicators vary across vehicle models, but understanding how to interpret them is vital for accurate maintenance. When checking the power steering fluid, drivers should familiarize themselves with their specific vehicle’s indicators to avoid costly repairs.

  1. Most reservoirs display MAX and MIN lines that clearly show the acceptable fluid level range – never operate a vehicle below the minimum mark.
  2. The fluid should be bright red or light amber when new, with darkening color indicating potential contamination or degradation.
  3. When adding fluid to the reservoir, pour slowly to avoid overfilling beyond the MAX line, which can damage the system.
  4. Check your car’s power steering fluid level with the dipstick (if equipped) by removing it, wiping it clean, reinserting it fully, then reading the measurement.

Understanding Power Steering Fluid Color and Condition

When examining your vehicle’s power steering fluid, its color and consistency offer vital clues about the system’s health. Fresh power steering fluid appears bright red, clear amber, or pink, indicating good fluid condition. Nonetheless, as the fluid degrades, it darkens to brown or black, signaling contamination that demands attention.

A visual inspection should also evaluate clarity—cloudy or murky fluid suggests dirt infiltration or aging that compromises steering performance. Additionally, particles or debris floating in the reservoir indicate severe contamination requiring immediate system flushing.

Pay attention to odors as well; a burnt smell suggests the fluid has overheated and broken down. Regular checks of color and clarity help vehicle owners maintain ideal steering responsiveness while preventing costly damage. Using premium transmission fluid can also enhance overall performance and longevity of the system.

When fluid appears dark and dirty, a fluid change becomes necessary to preserve system integrity.

How to Properly Add Power Steering Fluid

Adding power steering fluid requires following a specific technique to avoid system damage. Drivers must select the manufacturer-recommended fluid type as specified in their vehicle’s owner manual.

Careful attention to proper fluid levels prevents both under-filling, which causes poor steering response, and over-filling, which can damage seals and create leaks. Additionally, using fluids that provide excellent oxidation stability can enhance the performance and longevity of your steering system.

Proper Technique Matters

The proper technique for adding power steering fluid can make the difference between a successful maintenance task and potential system damage. When checking your vehicle’s power steering, attention to detail guarantees the fluid level remains critical and prevents contamination over time. The fluid should be changed when showing signs of deterioration, but properly adding it requires precision.

  • Always consult your vehicle’s owner’s manual to verify the correct fluid type before adding any
  • Use a clean funnel to pour fluid slowly, stopping before exceeding the MAX line
  • Securely tighten the reservoir cap after adding fluid to prevent contamination
  • Recheck fluid levels after a brief drive and steering to guarantee proper range

Proper technique prevents overfilling while maintaining the system’s integrity – vital for those who value vehicle independence and longevity.

Choose Right Fluid

Selecting the accurate atf power steering fluid stands as the most crucial decision in maintaining your vehicle’s steering system. The manufacturer specifies the appropriate type in your owner’s manual or on the reservoir label; using alternatives risks system damage.

Never mix different fluid types, as incompatible formulations can degrade performance markedly.

When the fluid is low, add it gradually using a clean funnel to prevent contamination. Pour slowly to achieve the proper level within the marked range on the reservoir.

Regularly check the fluid’s color—ideal fluid appears pink or amber and flows smoothly. Dark, cloudy, or burnt-smelling fluid indicates it’s time to change power steering fluid completely.

Maintaining the correct fluid level with the appropriate type ensures responsive steering and extends system life, granting drivers the freedom of worry-free operation.

Warning Signs of Low or Contaminated Power Steering Fluid

Recognizing warning signs of low or contaminated power steering fluid can prevent costly repairs and maintain safe vehicle operation. Vehicle owners who value their independence should monitor for these indicators that signal it’s time to check fluid level or quality.

  • Whining noise or squealing when turning the steering wheel often indicates low steering fluid levels or contamination.
  • Difficulty turning the wheel or increased steering effort suggests depleted or degraded fluid.
  • Muddy or burnt smell coming from the fluid or dark, cloudy appearance during inspection points to contamination requiring replacement.
  • Puddle of fluid beneath the vehicle combined with metal particles in the reservoir indicates potential component wear and demands immediate attention.

Additionally, improper lubrication can lead to increased wear on power steering components, so ensuring the use of high-performance extreme pressure grease is essential for prolonged equipment life.

These hazard warning signs should never be ignored, as doing so can lead to expensive power steering system damage.

Recommended Maintenance Schedule for Power Steering Systems

Proper maintenance of power steering systems extends vehicle life and prevents costly repairs that often occur when fluid levels are neglected. Vehicle manufacturers typically recommend changing power steering fluid every 2-4 years or 30,000-50,000 miles, though specific intervals vary by model.

A thorough maintenance schedule should include regular fluid inspection, checking for dark coloration, debris, or burnt odors that indicate contamination. When these signs appear, owners should flush the system completely rather than simply topping off fluid levels.

Smart vehicle maintenance includes monthly verification of power steering fluid levels and condition. While some modern vehicles require less frequent service, consulting the owner’s manual remains vital for specific guidance on maintenance intervals and appropriate fluid types, ensuring prime steering performance and longevity. Additionally, using high-quality lubricants can enhance system protection and efficiency.

DIY Power Steering Flush Methods and Best Practices

While regular monitoring of power steering fluid levels provides necessary preventative care, some vehicle owners may benefit from performing a complete system flush at home. This “poor man’s flush” effectively removes contaminants from the hydraulic system without specialized equipment, helping maintain steering responsiveness and component longevity.

Regular maintenance isn’t just for professionals. DIY power steering flushes can effectively remove contaminants while protecting your vehicle’s steering performance.

  • Remove old fluid: Use a turkey baster or siphon to extract contaminated power steering fluid from the reservoir.
  • Top off with proper fluid: Refill using only manufacturer-specified fluid to prevent system contamination.
  • Circulate fluid: Turn the steering wheel lock-to-lock several times to distribute fresh circulating fluid throughout the system.
  • Monitor fluid levels: Repeat the drain and fill process until the fluid appears clean, maintaining proper levels throughout.

Additionally, using a high viscosity index fluid, such as Industrial Gear Oil 320, can help enhance lubrication and protection in similar hydraulic systems. This DIY power steering flush should ideally be performed every 50,000 miles to maintain excellent hydraulic performance.

Conclusion

Regular inspection and maintenance of power steering fluid is vital for vehicle performance and longevity. By checking fluid levels, color, and condition according to manufacturer recommendations, drivers can prevent costly failures and guarantee smooth handling. Whether performing routine checks or a complete system flush, proper power steering maintenance is a simple yet critical aspect of responsible vehicle ownership.

For optimal steering performance and protection, consider using high-quality power steering fluid from trusted ATF fluid manufacturer in UAE like Armor Lubricants. Our power steering fluid is designed to meet demanding specifications, ensuring excellent lubrication, thermal and oxidation stability, and protection against wear and corrosion.

Don’t wait for problems to arise. Make regular checking of power steering fluid and timely changes as part of your vehicle maintenance routine.

DOT 3 vs. DOT 4 Brake Fluid: Key Differences and Applications

ultimate guide for the difference between dot 3 and dot 4 brake fluid

Choosing the right brake fluid is crucial for optimizing your vehicle’s performance. The decision between DOT 3 and DOT 4 can significantly influence how your car handles various driving conditions. Understanding the differences between Dot 3 and Dot 4 brake fluid lie in their boiling points, chemical composition, applications, and maintenance requirements will help you make an informed choice.

Key Differences Between Dot 3 and Dot 4

Brake Fluid

Boiling Points:

  • DOT 3 has a lower boiling point compared to DOT 4.
  • DOT 4 offers better performance under high-stress conditions due to its higher boiling point.

Applications:

  • DOT 3 is suitable for light-duty vehicles and everyday driving.
  • DOT 4 is recommended for vehicles that experience heavy braking, such as high-performance cars and those used for towing.

Maintenance:

  • DOT 3 typically requires more frequent replacement.
  • DOT 4 has better moisture resistance, leading to longer intervals between changes.

Deciding on the Best Fit for Your Vehicle

To determine the right brake fluid for your driving habits, assess the following:

  • Driving Style: Consider how often you drive in stop-and-go traffic or engage in aggressive braking.
  • Vehicle Specifications: Check your vehicle’s manual for manufacturer recommendations.
  • Environmental Factors: Evaluate the temperatures and moisture levels in your area, as these can affect brake fluid performance.

Real-World Examples

If you frequently drive a performance vehicle or regularly tow heavy loads, opting for DOT 4 will enhance your braking capabilities. Conversely, if your vehicle primarily serves daily commuting needs, DOT 3 may suffice.

By thoroughly evaluating your needs, you’ll ensure that your brake fluid choice matches your vehicle’s requirements, leading to safe and efficient driving experiences.

What’s the difference between dot 3 and dot 4 brake fluid which affects performance and lifespan?

When you’re choosing between DOT 3 and DOT 4 brake fluid, the differences in boiling points are vital to reflect on.

Understanding how each type performs can impact your vehicle’s braking reliability, especially under demanding conditions.

Plus, knowing about fluid compatibility is important to prevent any performance issues down the line.

Understanding Boiling Point Differences in Brake Fluids

Knowing the boiling point difference between DOT 3 and DOT 4 brake fluids helps you choose the right fluid for your vehicle.

  • DOT 3 has a dry boiling point of around 401°F (205°C) and a wet boiling point of approximately 284°F (140°C).
  • DOT 4 boasts a higher dry boiling point at 446°F (230°C) and a wet boiling point of 311°F (155°C).

Higher boiling points significantly reduce the risk of brake fade, thereby enhancing performance during heavy braking situations.

Since both fluids are hygroscopic, regular maintenance is essential. Regularly monitor boiling points and replace the fluid when necessary.

Choosing DOT 4 is advisable for high-performance applications. Using it in demanding conditions guarantees effective braking, which is crucial for safety and performance.

Key Reasons to Choose DOT 4 Brake Fluid

  • Higher dry boiling point reduces brake fade.
  • Better performance in high-demand braking situations.
  • Ideal for vehicles experiencing heavy use.

Why is Brake Fluid Compatibility Important?

Understanding Brake Fluid Compatibility: A Key to Optimal Performance

Maintaining proper brake fluid compatibility is essential for ensuring excellent braking performance. Mixing DOT 3 and DOT 4 fluids can lead to serious issues. Adding DOT 3 to a system designed for DOT 4 results in incompatible fluid types, resulting in reduced braking efficiency and potential system failures.

  • The boiling points of these fluids differ significantly.
  • DOT 3 has a lower boiling point, making it unsuitable for high-demand situations.
  • In contrast, DOT 4 exhibits higher moisture resistance, enhancing performance in extreme conditions.

Regular maintenance of your braking system significantly reduces safety risks related to improper brake fluid usage.

By understanding the properties of each fluid type, you can make informed decisions regarding your vehicle’s braking system.

Key considerations for brake fluid compatibility include:

  • Performance: Ensure that the boiling point meets your driving needs.
  • Moisture Resistance: Choose fluids with superior moisture absorption characteristics.
  • Maintenance: Regularly check and flush the braking system to maintain optimal performance.

Focusing on these elements not only improves your braking system’s reliability but also enhances safety on the road.

Prioritizing this knowledge helps you better care for your braking system, and in turn, extends its lifespan.

Performance Implications: DOT 3 vs DOT 4

Selecting brake fluid significantly influences your vehicle’s performance, particularly in demanding driving conditions.

DOT 4 boasts a higher dry boiling point of around 446°F, compared to DOT 3’s 401°F. This higher boiling point makes DOT 4 a better choice for high-performance scenarios or heavy towing. While DOT 3 suffices for routine driving, its lower boiling point can create challenges during intense braking situations.

Consider these important points when choosing brake fluid:

  • Hygroscopic Nature: DOT 4 absorbs moisture more quickly, requiring more frequent fluid changes to maintain optimal performance.
  • Compatibility: You can mix DOT 3 and DOT 4, but avoid using DOT 3 in a system designed for DOT 4. Doing so compromises braking performance.

Performance Under Pressure: When to Choose DOT 4 Over DOT 3?

When your driving demands push your vehicle to its limits, choosing the right brake fluid becomes crucial for safety and performance. DOT 4’s superior temperature resistance markedly reduces brake fade during aggressive driving, giving you the confidence to push harder. Additionally, using high-quality products like premium motor oil can enhance overall vehicle performance.

Driving Condition DOT 3 DOT 4 Advantage
High-heat scenarios 401°F boiling point 446°F boiling point DOT 4 resists failure
Aggressive braking Moderate fade resistance Superior fade resistance Enhanced control
Towing heavy loads Adequate Recommended Better safety margin
Mountain driving Compromised Ideal Consistent performance

While DOT 4 absorbs water more quickly, its higher boiling point preserves better performance even when wet. If you’ve got high-performance braking systems or towing requirements, DOT 4 is your freedom ticket—just commit to routine maintenance for maximum protection.

Choosing the correct brake fluid is essential for reliable braking.

Prioritize your vehicle’s braking efficiency by opting for DOT 4, especially if you’re engaged in heavy towing or vigorous driving.

When Should You Use DOT 3 Brake Fluid?

You should use DOT 3 brake fluid for standard vehicles that don’t require high-performance braking.

It’s ideal for typical driving conditions, where temperature changes and heavy braking aren’t an issue.

Nevertheless, be cautious about mixing DOT 3 with other types of brake fluid, as that can affect performance and safety.

Typical Applications for DOT 3 Brake Fluid

Understanding the Benefits of DOT 3 Brake Fluid for Everyday Driving

DOT 3 brake fluid serves as an excellent choice for drivers managing routine braking situations. This fluid works effectively in standard brake systems commonly found in everyday vehicles that experience moderate braking needs.

If your vehicle generally operates under typical braking conditions without exposure to extreme heat, DOT 3 brake fluid delivers reliable performance. One notable advantage of using this fluid is its slower absorption of moisture, which results in less frequent changes compared to other brake fluids.

Here are key considerations for using DOT 3 brake fluid:

  • Performance: Suitable for standard brake systems in daily drivers.
  • Humidity Resistance: Absorbs moisture slowly, extending change intervals.
  • Safety: The right brake fluid ensures optimal brake functionality.

Always verify the compatibility of DOT 3 brake fluid with your vehicle by consulting the owner’s manual. Selecting the appropriate fluid promotes safe and efficient braking, aligning with the demands of everyday driving.

The Impact of Temperature on DOT 3 Fluid

Understanding the Impact of Temperature on DOT 3 Brake Fluid

Choosing the right brake fluid is crucial for vehicle performance, and temperature significantly influences whether DOT 3 is suitable for your needs. With a dry boiling point of approximately 401°F (205°C) and a wet boiling point around 284°F (140°C), DOT 3 functions well in standard driving conditions without high-performance demands.

However, high-temperature situations or heavy loads can cause brake fade due to its lower boiling point compared to DOT 4. While DOT 4 manages humidity more effectively and withstands extreme braking conditions, DOT 3 remains a wise choice for everyday driving if you don’t frequently push your vehicle to the limits.

Key Considerations for DOT 3 Brake Fluid:

  • Suitable for Standard Conditions: Ideal for regular driving without extreme conditions.
  • Monitor Condition: Regular checks are essential, as dark fluid indicates possible degradation.
  • Limitations in High Temperatures: Be cautious in hot environments or heavy loads, as performance may suffer.

Mixing DOT 3 with Other Types of Brake Fluid

Mixing DOT 3 Brake Fluid: What You Need to Know

Mixing DOT 3 brake fluid with other types, like DOT 4, poses risks despite similar chemical bases. Understanding the implications of this mix is crucial for maintaining safety and performance.

  1. Boiling Point: DOT 4 features a higher boiling point. Adding DOT 3 can compromise this advantage, potentially leading to brake failure under extreme conditions.
  2. Performance: Mixing can significantly diminish braking effectiveness, especially in high-demand driving situations, where reliable brakes are essential.
  3. Temporary Solution: While using DOT 3 in a DOT 4 system may serve as a stopgap, it’s not a viable long-term strategy.
  4. Maintenance: Regular brake fluid replacement every two years or 30,000 miles is necessary. This routine helps prevent humidity absorption and fluid degradation.

Thoughtful consideration guarantees your braking system remains effective and safe, ultimately enhancing your driving experience.

When Should You Use DOT 4 Brake Fluid?

If you drive a high-performance vehicle or frequently tow heavy loads, using DOT 4 brake fluid is a smart choice.

Its higher boiling point and dampness absorption rates help you maintain reliable braking under stress, ensuring safety and performance.

Plus, it’s compatible with systems designed for DOT 3, making it a versatile option for many drivers.

Benefits of Using DOT 4 Brake Fluid

Benefits of Using DOT 4 Brake Fluid

Driving through steep hills, towing heavy loads, or navigating stop-and-go traffic becomes much safer with DOT 4 brake fluid, which significantly enhances your vehicle’s braking performance.

Below are the key benefits you can expect:

  1. Higher boiling point: A dry boiling point of approximately 446°F (230°C) allows DOT 4 to handle high-performance situations better than DOT 3.
  2. Improved moisture absorption: The fluid effectively absorbs moisture, which helps prevent brake fade and ensures consistent performance.
  3. Braking reliability: Regular use of DOT 4 increases overall braking reliability, particularly in extreme driving conditions.
  4. Compatibility with advanced systems: Recommended for anti-lock braking systems (ABS) and high-performance braking setups, DOT 4 delivers superior responsiveness when you need it the most.

Is DOT 4 Compatible with DOT 3 Systems?

Can You Use DOT 4 Brake Fluid in a DOT 3 System?

Wondering if you can upgrade your brake system? Using DOT 4 brake fluid in a DOT 3 system is a viable option.

This fluid offers a higher boiling point, enhancing performance for drivers who frequently engage in high-speed or heavy braking situations.

Benefits of Using DOT 4:

  • Higher boiling point for improved performance under stress.
  • Better braking efficiency, especially during heavy use.
  • Suitable for those looking to increase the overall performance of their brake system.

Keep in mind that DOT 4 absorbs moisture faster than DOT 3. Increased moisture absorption may require more frequent changes to maintain optimal braking performance.

Important Considerations:

  • Never mix DOT 4 with DOT 5 or DOT 5.1, as their chemical compositions are incompatible.
  • Always adhere to your manufacturer’s specifications to maintain safety and functionality.

Upgrading to high quality DOT 4 brake fluid can significantly enhance your braking system.

Make this switch wisely, ensuring the longevity and performance of your vehicle’s braking capabilities.

DOT 4 Brake Fluid in High-Performance Vehicles

Why DOT 4 Brake Fluid is Crucial for High-Performance Vehicles

Driving your vehicle at high speeds or towing heavy loads demands superior braking performance. DOT 4 brake fluid plays a vital role in achieving that performance. Here’s why it’s the ideal choice:

  1. Higher Boiling Point: With a dry boiling point of around 446°F (230°C), DOT 4 brake fluid actively prevents brake fade under intense pressure.
  2. Exceptional Heat Resistance: This fluid can withstand extreme temperatures, providing reliable braking force exactly when you need it.
  3. Compatibility with Advanced Braking Systems: Vehicles equipped with ABS gain from DOT 4’s enhanced thermal stability, which boosts performance and safety.
  4. Regular Fluid Changes Required: Due to its higher moisture absorption rate, changing DOT 4 more frequently is crucial to maintain peak braking performance.

Always review your owner’s manual to verify if DOT 4 brake fluid suits your vehicle’s high-performance needs.

Prioritize optimal safety and efficiency on the track or road.

How Do the Boiling Points of DOT 3 and DOT 4 Compare?

When comparing the boiling points of DOT 3 and DOT 4 brake fluids, you’ll notice important differences.

DOT 3 has a lower dry and wet boiling point, whereas DOT 4 offers higher numbers that improve its performance during intense braking.

Understanding these boiling points helps you choose the right fluid for your vehicle’s needs.

Dry vs. Wet Boiling Points Explained

Understanding the difference between DOT 3 and DOT 4 brake fluid is essential for maintaining effective braking performance. Here’s how these fluids compare:

  1. Dry Boiling Point:
    • DOT 3: Approximately 401°F (205°C)
    • DOT 4: Approximately 446°F (230°C)
  2. Wet Boiling Point:
    • DOT 3: About 284°F (140°C)
    • DOT 4: Around 311°F (155°C)
  3. Moisture Absorption:
    • DOT 4 exhibits superior resistance to moisture absorption. This characteristic helps maintain brake performance over time.
  4. Vapor Lock Risk:
    • With its higher boiling points, DOT 4 significantly reduces the risk of vapor lock, especially in demanding driving conditions.

Choosing the correct brake fluid based on these boiling points remains vital for optimal braking performance and safety.

Always prioritize recommended specifications to ensure your vehicle operates at its best.

Impact of Boiling Point on Brake Performance

Understanding the Role of Boiling Points in Brake Performance

The boiling points of brake fluid play a critical role in enhancing brake performance, especially in high-demand driving situations.

DOT 3 features a dry boiling point of around 401°F (205°C) and a wet boiling point of 284°F (140°C). In contrast, DOT 4 offers a superior dry boiling point of 446°F (230°C) and a wet boiling point of 311°F (155°C).

Higher boiling points in DOT 4 enhance its resistance to vaporization during intense braking. This resistance helps prevent brake fade, maintaining a responsive pedal feel.

Both fluids possess hygroscopic qualities, meaning they absorb moisture. However, DOT 4 absorbs humidity at a faster rate, necessitating more frequent fluid changes to uphold optimal performance.

Key considerations for selecting brake fluid include:

  • Boiling Point: Higher boiling points resist vaporization.
  • Fluid Change Frequency: Humidity absorption rates dictate maintenance schedules.
  • Performance Applications: Determine needs based on driving conditions and vehicle type.

Choosing the appropriate boiling point is vital for safe braking, particularly in high-performance or heavy-duty conditions.

Prioritizing these factors can significantly enhance safety and performance on the road.

Choosing the Right Brake Fluid for Your Vehicle

Choosing the Right Brake Fluid for Your Vehicle: DOT 3 vs. DOT 4

Selecting the appropriate brake fluid for your vehicle requires careful consideration of your driving style and environmental conditions.

Here’s what you need to know:

  1. Boiling Points: DOT 3 has a lower boiling point compared to DOT 4, resulting in DOT 4 being a better choice for high-stress braking situations.
  2. Performance: DOT 4 generally provides better handling for high-performance vehicles or during heavy braking.
  3. Fluid Changes: DOT 4 absorbs moisture more rapidly, so you’ll need to change it more often than DOT 3.
  4. Manufacturer Specifications: Always consult your vehicle’s manufacturer specifications to guarantee optimal braking performance.

Understanding these factors will help you make an informed decision on whether to choose DOT 3 or DOT 4 brake fluid.

Can You Mix DOT 3 and DOT 4 Brake Fluids?

You might wonder if mixing DOT 3 and DOT 4 brake fluids is safe.

Although they’re both glycol ether-based, mixing them can affect your braking performance and efficiency.

Let’s explore the risks and best practices for maintaining your brake fluid.

Understanding the Risks of Mixing Brake Fluids

Risks of Mixing Brake Fluids: Why You Should Think Twice

Mixing DOT 3 and DOT 4 brake fluids may seem like an easy solution, but this practice can significantly compromise your vehicle’s braking performance.

Consider the following key risks:

  1. Boiling Points: With lower boiling points, DOT 3 can lead to brake fade when combined with high-performance DOT 4 fluid.
  2. Degradation: Mixing these fluids can accelerate brake fluid degradation, rendering it ineffective over time.
  3. Compatibility Issues: Although both fluids are glycol ether-based, their performance discrepancies make mixing inadvisable.
  4. Maintenance Risks: Regular maintenance proves crucial. If brake fluid darkens, it signals the need for a change, regardless of fluid type.

To keep your braking system safe and effective, follow manufacturer recommendations. Avoid mixing DOT 3 and DOT 4 brake fluids to maintain optimal performance and reliability.

What Happens When You Mix DOT 3 and DOT 4?

Mixing DOT 3 and DOT 4 brake fluids can be tempting, especially in urgent situations. Both fluids are glycol ether-based, and adding DOT 4 to a DOT 3 system may enhance performance. However, caution is necessary since this combination can alter moisture absorption and lead to decreased braking efficacy over time.

Here’s a quick comparison highlighting the differences:

Feature DOT 3 DOT 4
Boiling Points Lower Higher
Moisture Absorption Rate Slower Faster
Performance Under Stress Adequate for light use Superior

For optimal braking performance, flush and replace the old fluid rather than mixing types. Always verify that your brake fluid is in excellent condition before performing any maintenance.

Best Practices for Brake Fluid Maintenance

Understanding the risks of mixing DOT 3 and DOT 4 brake fluids is essential for effective brake fluid maintenance.

To achieve peak brake performance, follow these best practices:

  1. Regular Replacement: Change brake fluid every two years or every 30,000 miles. This practice counters moisture absorption and maintains a high boiling point.
  2. Color Check: Inspect the brake fluid’s color. Healthy brake fluid appears clear yellowish to light brown. Dark fluid indicates a need for replacement.
  3. System Flush: Perform periodic flushes of the brake fluid system to prevent buildup. These flushes guarantee effective braking.
  4. Monitor Performance: Remain attentive to any changes in brake performance. Noticeable fade may signal degraded fluid, which requires immediate attention.

What Are the Common Misconceptions About Brake Fluids?

You might think that all brake fluids are the same, but misconceptions can put your safety at risk.

Understanding the differences in absorption rates and boiling points is vital when choosing between DOT 3 and DOT 4.

Let’s clarify these myths and highlight why selecting the right fluid truly matters for your vehicle’s performance.

Debunking Myths About DOT 3 and DOT 4

Many drivers mistakenly believe that all brake fluids are interchangeable, but this can lead to significant performance issues.

Here are some prevalent myths about DOT 3 and DOT 4 brake fluids:

  1. Interchangeability: Because DOT 3 and DOT 4 possess different boiling points, each one is tailored for specific applications. Using the wrong fluid can cause your brakes to underperform.
  2. Humidity Absorption: DOT 4 is more hygroscopic, meaning it absorbs moisture more rapidly. This can lead to quicker degradation of the brake fluid and potential brake failure.
  3. Mixing Brake Fluid: Adding DOT 4 to a DOT 3 system is generally safe; however, introducing DOT 3 into a DOT 4 system can create serious performance risks. Each fluid works optimally under its designated specifications.
  4. Ignoring Manufacturer Recommendations: Not adhering to manufacturer guidelines for brake fluid can jeopardize your vehicle’s braking performance and safety.

Always prioritize manufacturer recommendations for brake fluid to achieve peak performance in your vehicle.

Opting for the correct type ensures reliable and efficient braking action.

Understanding the Importance of Fluid Absorption

Understanding the Importance of Fluid Absorption in Brake Systems

Effective humidity absorption is crucial for optimal brake system performance. Both DOT 3 and DOT 4 brake fluids are hygroscopic, which means they absorb moisture over time. This moisture absorption lowers the boiling point of the fluid, increasing the risk of brake fade and compromising performance.

Many believe that mixing DOT 3 and DOT 4 fluids is safe. However, while DOT 3 can supplement DOT 4 systems, adding DOT 4 to a DOT 3 system poses risks due to the higher boiling point requirements of DOT 4. Regularly changing brake fluid is essential to prevent corrosion and degradation of system components.

Comparison of Brake Fluids

Brake Fluid Moisture Absorption Rate Boiling Point
DOT 3 Slower Lower
DOT 4 Faster Higher

Key Takeaways:

  • Moisture absorption reduces the boiling point, elevating the risk of brake failure.
  • Upgrading to high-quality fluids enhances safety and reliability.

Understanding these properties helps drivers maintain their vehicles effectively, ensuring safety on the road.

Why Choosing the Right Fluid Matters for Safety

The Importance of Choosing the Right Brake Fluid for Safety

Selecting the appropriate brake fluid is crucial for road safety. Many drivers misunderstand the types of fluids available, which can lead to serious problems.

  • Interchangeability: Not all brake fluids can substitute for one another. Using an incorrect type may weaken safety and performance.
  • Mixing Fluids: Mixing DOT 3 and DOT 4 is generally acceptable, but combining DOT 3 with a DOT 4 system poses risks due to lower boiling points.
  • Regular Replacement: Brake fluid absorbs moisture from the air, which reduces its boiling point. Frequently replacing brake fluid prevents vaporization during hard braking situations.
  • Manufacturer Specifications: Follow your vehicle manufacturer’s specifications for brake fluid to maintain optimal performance and safety.

The right brake fluid significantly impacts your vehicle’s braking efficiency and overall safety. Prioritize the fluid you choose to protect you and others on the road.

Frequently Asked Questions

Q1: Can DOT 4 Be Used Instead of DOT 3?

Ans: Yes, you can use DOT 4 instead of DOT 3. It’s compatible and offers better performance. Just remember to check your vehicle’s manual and be prepared for more frequent fluid changes with DOT 4.

Q2: How Do I Know if I Need DOT 3 or DOT 4 Brake Fluid?

Ans: To determine whether you need DOT 3 or DOT 4 brake fluid, check your vehicle’s manual. It’ll specify the recommended type based on performance requirements, ensuring ideal braking safety and functionality for your driving conditions.

Q3: Does DOT 4 Brake Fluid Have a Higher Boiling Point Than DOT 3?

Ans: Yes, DOT 4 brake fluid has a higher boiling point than DOT 3. It can handle higher temperatures, which helps prevent brake fade during intense braking situations, ensuring your vehicle maintains reliable performance.

Q4: Can I Use Dot 4 Brake Fluid in Older Cars?

Ans: Yes, you can use DOT 4 brake fluid in older cars that originally use DOT 3, but it’s crucial to check your vehicle’s manual first to verify compatibility and avoid any potential braking issues.

Why This Matters?

Understanding the crucial differences between DOT 3 and DOT 4 brake fluids is vital for vehicle safety and performance. DOT 4 fluid offers superior resistance to vapor lock, especially in modern vehicles or demanding driving conditions. While DOT 3 fluid is more susceptible to performance degradation with even small amounts of water contamination. Always consult your vehicle’s owner’s manual to determine the specified DOT rating by the manufacturer. Using the right brake fluid, specially superior quality from trusted lubricants manufacturers like Armor Lubricants in the UAE, ensures optimal braking efficiency, safety and performance.

Expert Chainsaw Maintenance Tips

essential chainsaw maintenance tips

Essential Chainsaw Maintenance Tips for Optimal Performance

Proper chainsaw maintenance forms the backbone of both performance and safety. A sharp chain and correct tension play crucial roles in your chainsaw’s effectiveness. Follow these essential steps to keep your chainsaw in excellent condition for any task ahead.

Key Maintenance Steps

  • Sharpen the Chain Regularly: A sharp chain cuts more efficiently and reduces strain on the engine. Use a file or a chainsaw sharpener to maintain the chain’s sharpness.
  • Adjust the Chain Tension: A properly tensioned chain prevents damage. Check tension frequently, especially before use, and adjust as necessary.
  • Clean the Air Filter: Clogged air filters hinder performance. Remove and clean the air filter regularly to ensure proper airflow.
  • Check the Bar and Chain Oil: Sufficient lubrication is essential for smooth operation. Regularly check oil levels and refill with high-quality Armor Lubricants.
  • Inspect the Spark Plug: A clean spark plug ensures efficient combustion. Replace a fouled spark plug to maintain optimal engine performance.
  • Store Correctly: After use, store the chainsaw in a dry place with a protective cover. This will prevent rust and prolong its lifespan.

By following these steps, you’ll promote the longevity and reliability of your chainsaw while ensuring your safety during operation. Regular maintenance not only enhances performance but also provides peace of mind on the job.

What are the key chainsaw maintenance tips?

Keeping your chainsaw in top shape is easier than you think. Regular maintenance not only boosts performance but likewise extends its lifespan, saving you money in the long run.

Let’s explore crucial tips and tools to guarantee your chainsaw runs smoothly every time you need it.

How to keep your chainsaw in great condition?

Keeping Your Chainsaw in Top Condition

Regular maintenance plays a crucial role in maintaining the excellent performance of your chainsaw.

Chain Maintenance

  • Sharpen the chainsaw chain regularly to enhance cutting efficiency.
  • Use a properly sized file and apply three to six consistent strokes per tooth.

Chain Tension

  • Check the chain tension while operating the chainsaw.
  • The chain should be snug but not overly tight to avoid overheating.

Air Filter Care

  • Clean the air filter frequently to eliminate debris buildup that could damage the engine.

Fuel and Oil

  • Always use fresh gasoline mixed with the correct two-stroke oil.

Bar Components and Safety Features

  • Conduct periodic checks of the bar components and safety features.

Implementing these chainsaw maintenance tips will promote smooth operation and optimize the longevity of your tool.

This ensures you maximize each use for years to come.

Why is regular maintenance important for your chainsaw?

Why Regular Maintenance is Crucial for Your Chainsaw

Regular maintenance is essential for maximizing your chainsaw’s performance and extending its lifespan. A well-maintained chainsaw operates more smoothly and efficiently, allowing you to tackle cutting tasks with ease.

Key maintenance practices include:

  • Checking the chain: Regularly inspect the condition of your chain. A sharp, well-tensioned chain cuts effectively and reduces engine strain.
  • Inspecting throttle and safety features: Ensure that all safety mechanisms function correctly. This guarantees safe operation during use.
  • Cleaning air and fuel filters: Frequent inspections prevent contamination that can damage engine components. Clean filters support optimal engine performance.
  • Tensioning chains properly: A properly tensioned chain minimizes the risk of stalling, enhancing both your safety and cutting efficiency.
  • Cleaning cooling fins and carburetors: Regular cleaning helps prevent overheating, allowing your chainsaw to run at peak performance.

By committing to these maintenance practices, you’ll improve performance and keep your chainsaw ready for any job.

This proactive approach not only safeguards your tool but also ensures that it faithfully serves you whenever needed.

Choose high-quality products like Armor Lubricants to support your maintenance efforts and elevate your chainsaw’s reliability.

What are the essential tools for chainsaw maintenance?

Essential Tools for Chainsaw Maintenance

Maintaining a chainsaw effectively requires the right tools. Assemble a maintenance toolkit that includes:

  • A file gauge for sharpening the chain
  • A suitable file for sharpening the teeth
  • A depth gauge to maintain performance
  • A tensioning tool or screwdriver to adjust chain tension

For cleaning, utilize a brush or cloth to remove debris. An air compressor effectively clears the air filter and carburetor, promoting optimal function.

Keep a spark plug wrench handy for checking and maintaining spark plugs. This action promotes proper ignition and ensures your chainsaw runs smoothly.

Investing in safety gear such as gloves and goggles is essential to protect yourself during maintenance tasks.

Prioritizing these tools will significantly enhance your chainsaw’s performance and longevity.

How to clean your chainsaw effectively?

To keep your chainsaw in top shape, regular cleaning of key parts is essential.

Start with the air filter, which you can easily clean with compressed air, and then focus on the bar and chain to guarantee they’re free of debris.

Maintaining these components not only prolongs your tool’s life but likewise improves its performance.

What parts of the chainsaw need regular cleaning?

Regular Cleaning Essentials for Your Chainsaw

Loving the power and efficiency of your chainsaw means understanding the importance of cleanliness for optimal performance and longevity.

Here are the key parts that require regular cleaning:

  • Air Filter: Regularly clean the air filter to prevent dirt buildup, which can clog the carburetor and decrease engine performance.
  • Guide Bar: Always clean the guide bar, focusing on the sprocket nose and oil channels. This action helps maintain proper lubrication.
  • Chainsaw Body: After each use, remove any resin and debris from the body. This practice prevents performance issues.
  • Spark Plug: Inspect the spark plug frequently and remove any carbon buildup. A clean spark plug guarantees effective ignition.
  • Cooling Fins: Periodically check the cooling fins on the cylinder to avoid engine overheating. Keeping these fins clean improves airflow and efficiency.

A consistently clean chainsaw not only performs better but also lasts longer. Make this maintenance a priority in your routine!

How to clean the air filter of your chainsaw?

Cleaning the air filter of your chainsaw is essential for optimal performance. Focus on this key component to maintain efficiency and reliability. Follow these steps to clean and check your air filter effectively:

  • Remove the air filter cover: Refer to your manufacturer’s guidelines for specific instructions pertaining to your model.
  • Blow out debris: Use compressed air to gently clear sawdust without forcing it deeper into the filter.
  • Wash foam filters: Clean foam filters with warm soapy water. Rinse thoroughly and allow them to dry completely.

Regular inspections of your air filter for damage or wear are vital. If the filter appears clogged or ineffective, replace it immediately.

Establish a maintenance routine after every 5-10 uses, especially in dusty conditions.

What is the best way to clean the bar and chain?

Maximize Your Chainsaw Performance with Proper Bar and Chain Cleaning

To guarantee optimal chainsaw operation, cleaning the bar and chain is essential. Begin by removing the bar and chain assembly. Use a soft brush to eliminate sawdust and resin buildup from the bar groove and chain links.

Scrub the sprocket nose and oil channels with warm soapy water to clear away residues that can hinder lubrication. After cleaning, thoroughly dry the components to prevent rust formation. Regularly inspect the bar for burrs and use a file to deburr as necessary.

Consistent maintenance keeps your chainsaw in prime condition.

Step Action Tools
1 Remove bar and chain assembly None
2 Clean with a soft brush Soft brush
3 Scrub sprocket and oil channels Brush, soap
4 Inspect and deburr Files

Engaging in this routine will enhance the longevity and efficiency of your chainsaw. Remember, a well-maintained tool not only performs better but also ensures safety during use.

How to lubricate your chainsaw properly?

To keep your chainsaw running smoothly, knowing the right type of oil is essential.

You should regularly lubricate the chain and bar, especially if you notice any signs of wear or reduced performance.

Let’s explore the best practices for lubrication to guarantee your chainsaw remains in top shape.

What type of oil should you use for your chainsaw?

Choosing the Right Oil for Your Chainsaw

Selecting the best oil for your chainsaw plays a crucial role in maintaining its performance. Always opt for high-quality bar and chain oil specifically designed for chainsaws. This choice protects your chain and bar from overheating and damage. Regularly check and refill the oil reservoir to avoid operational issues.

  • Dirty or contaminated oil can accelerate wear and tear on your equipment.
  • Ensure the oil’s viscosity matches the ambient temperature for optimal operation.
  • Lubricate the chain after each use to enhance performance and prolong its lifespan.

Using the correct oil not only safeguards your equipment but also promotes smoother cutting experiences. Trust Armor Lubricants for reliable and effective lubrication solutions that meet your chainsaw’s needs.

How often should you lubricate the chain and bar?

How Often to Lubricate Your Chainsaw Chain and Bar

Regular lubrication of the chain and bar on your chainsaw is crucial. It maintains performance and prevents excessive wear.

  • Lubricate before each use to achieve optimal performance. This practice reduces friction while cutting.
  • Monitor the oil reservoir closely. Top it off as necessary, especially during extended use or after heavy jobs lasting an hour or more.
  • Use the right bar and chain oil. The proper viscosity ensures oil clings effectively to the chain.

While operating, keep an eye on the oil flow. Inadequate oil spray can lead to overheating, resulting in damage.

Regular maintenance of the oiling system is essential. Check for and replace clogged filters to prolong the chain’s lifespan.

Following these steps keeps your chainsaw in prime condition.

What are the signs that your chainsaw needs lubrication?

Signs Your Chainsaw Needs Lubrication

Recognizing the need for lubrication in your chainsaw is crucial for maintaining its performance and longevity. Here are key indicators to watch for:

  • Excessive smoke: Smoke while cutting signals a serious issue that requires immediate attention.
  • Binding and stalling: A properly lubricated chain should move smoothly. Binding or stalling indicates inadequate lubrication.
  • Dry or shiny guide bar: Inspect the guide bar closely. It should remain consistently oiled. Any dry spots indicate a problem.

Monitor the oil reservoir regularly. A low oil level often points to the need for a refill or indicates a malfunction in the lubrication system.

Taking timely action can protect your chainsaw’s sprocket and extend its lifespan.

Using Armor Lubricants will help optimize the performance of your chainsaw, ensuring it runs smoothly and efficiently.

What are the specifics of gas chainsaw maintenance?

When it comes to gas chainsaw maintenance, keeping an eye on your spark plugs is essential for efficient engine performance.

You’ll additionally want to understand the role of fuel stabilizer in preserving your gas and preventing damage during long storage periods.

Finally, maintaining the carburetor guarantees your saw runs smoothly, so let’s explore these key aspects together.

How to check spark plugs in a gas chainsaw?

Essential Steps to Check Spark Plugs in Your Gas Chainsaw

Conducting regular checks on the spark plugs in your gas chainsaw ensures optimal performance and longevity. Follow these steps for effective maintenance.

1. Disconnect the Spark Plug Wire:

For safety, start by detaching the spark plug wire from the spark plug.

2. Remove the Spark Plug:

Use a socket wrench to carefully unscrew the spark plug from the engine.

3. Inspect the Spark Plug:

Look for signs of wear, such as carbon buildup. This residue can indicate potential fuel or engine issues.

  • Experience the satisfaction of a well-maintained tool.
  • Prevent unexpected breakdowns.
  • Benefit from consistent, powerful performance.

4. Clean the Spark Plug:

Utilize a wire brush or compressed air to eliminate any buildup from the spark plug.

5. Measure the Spark Plug Gap:

Use a feeler gauge to verify the gap, adjusting it to the manufacturer’s specifications (typically 0.020 to 0.025 inches).

6. Reinstall the Spark Plug:

Place the spark plug back into the engine and reconnect the wire. Make sure it sits securely, but avoid overtightening.

By following these steps, you’ll maintain a high-performing chainsaw while ensuring safety during operation.

Prioritize this simple maintenance task to enjoy your chainsaw for years to come.

What is the role of fuel stabilizer in gas chainsaw maintenance?

The Importance of Fuel Stabilizer in Gas Chainsaw Maintenance

A fuel stabilizer plays a crucial role in maintaining your gas chainsaw. It preserves gasoline freshness, preventing deterioration that leads to starting difficulties and performance issues. Stale fuel can clog the carburetor and create varnish buildup, disrupting engine performance.

Benefits of using a fuel stabilizer include:

  • Improved Engine Performance: Keeps fuel optimized for better combustion.
  • Reduced Carbon Deposits: Lowers the likelihood of buildup that could hinder operation.
  • Smoother Operation: Provides consistent performance, especially after storage.

Add a stabilizer before storing your chainsaw to enjoy these advantages for up to six months. This proactive maintenance step helps you avoid potential repairs from clogged fuel systems caused by old gasoline.

Incorporating a fuel stabilizer into your storage routine promotes the longevity of your chainsaw. Reliable performance awaits when you need it most, making it an essential practice for any chainsaw user.

How to maintain the carburetor of a gas chainsaw?

Essential Guide to Carburetor Maintenance for Gas Chainsaws

Regular maintenance of your gas chainsaw’s carburetor is crucial for optimal performance and longevity. Follow these steps to ensure your chainsaw runs smoothly:

  1. Clean the Carburetor
    • Remove the carburetor from the saw.
    • Use compressed air to blow out dirt and debris from the jets.
  2. Check the Fuel Filter
    • Inspect the filter for clogs.
    • A clean filter guarantees proper fuel delivery and enhances engine performance.
  3. Adjust Air-Fuel Mixture Screws
    • Set the screws according to the manufacturer’s specifications.
    • Correct adjustments prevent stalling and promote efficient operation.
  4. Inspect Diaphragm and Gaskets
    • Examine for wear and replace any damaged parts.
    • This prevents leaks and maintains reliable performance.
  5. Securely Mount the Carburetor
    • Ensure proper installation to avoid air leaks.
    • A well-mounted carburetor limits performance issues.

Regular maintenance helps you avoid costly repairs and delivers smoother cuts.

Moreover, it reduces emissions, benefiting the environment.

What should you know about electric and cordless chainsaw maintenance?

When it comes to electric and cordless chainsaws, maintenance is a bit different than with gas models.

You should focus on keeping battery slots clean and regularly checking for debris in the motor area to prevent overheating.

Plus, monitoring battery life and performance will help guarantee your chainsaw runs efficiently whenever you need it.

How does electric chainsaw maintenance differ from gas?

Electric chainsaws offer an easier maintenance experience compared to gas models.

However, knowing their specific needs is essential for optimal performance.

Here’s what to focus on:

  • Fewer moving parts result in reduced maintenance hassle.
  • Regularly check lubricant levels in automatic oiling systems.
  • Keep battery contacts clean to enhance cordless chainsaw upkeep.

Follow your owner’s manual for critical maintenance guidelines. Electric models eliminate the need for fuel mixing and spark plugs, making them simpler to handle.

Additionally, their air filters require less frequent cleaning.

Avoid operating your electric chainsaw in wet conditions unless it’s specifically designed for such environments.

Dampness can harm vital electrical components and create safety hazards.

To summarize, maintaining an electric chainsaw involves:

  • Confirming lubricant levels are adequate.
  • Cleaning battery contacts regularly.
  • Consulting the owner’s manual for specific instructions.

What are the maintenance tips for cordless chainsaws?

Essential Maintenance Tips for Cordless Chainsaws

Regular maintenance of your cordless chainsaw boosts its reliability and performance.

Here are key practices to follow:

  • Clean the exterior: Use a soft brush or cloth to remove sawdust and debris.
  • Check battery contacts: Ensure that battery contacts and slots remain dust-free to maintain optimal performance.
  • Inspect the guide bar and chain: Regularly examine them for burrs and confirm they receive proper lubrication. This prevents wear and overheating.
  • Monitor battery health: Look for swelling or damage. Store batteries in a cool, dry location to extend lifespan.
  • Maintain air ventilation: Keep the ventilation slits clean to prevent overheating and improve motor efficiency during operation.

Taking these proactive steps will significantly enhance the longevity and functionality of your cordless chainsaw.

Regular attention to these maintenance tasks can save you time and effort in the long run, ensuring your tool is always ready for the next job.

How to check the battery life and performance of a cordless chainsaw?

To keep your cordless chainsaw performing at its best, regularly check the battery life and overall performance.

  1. Check the battery charge level. Most models feature a charge indicator light that makes this easy.
  2. Clean the battery contacts using a soft cloth. This action prevents corrosion and enhances battery performance.
  3. Observe the chainsaw during use for any signs of reduced power. If you notice a drop in performance, address it promptly.
  4. Store batteries at room temperature. This practice prolongs their lifespan and maintains optimal performance.
  5. Always confirm the battery is fully charged before planning long breaks to ensure readiness for your next task.

Staying proactive about these battery checks can significantly enhance the efficiency of your cordless chainsaw while extending the life of its battery.

How to check and adjust the chain tension on your chainsaw?

Maintaining proper chain tension is vital for your chainsaw’s performance and safety.

It guarantees smooth cutting and prevents wear on the bar and chain.

You’ll only need a few basic tools to check and adjust it, so let’s get started!

Why is maintaining chain tension key to performance?

Maintaining precise chain tension while operating your chainsaw is vital for achieving high-quality cutting performance. Proper chain tension guarantees efficient contact with wood, which minimizes the risk of binding or stalling. A loose chain can cause excessive wear and tear; conversely, an over-tightened chain may lead to overheating and breakage.

Regularly checking and adjusting chain tension during use is essential.

Benefits of proper chain tension:

  • Enhances cutting efficiency
  • Reduces costly repairs and replacements
  • Promotes smoother, safer operation

Taking a few moments to adjust the tension keeps your chainsaw running at its best. A well-tensioned chain extends the life of your tool, making your work more enjoyable and productive.

What tools are needed to adjust chain tension

Essential Tools for Chainsaw Chain Tension Adjustment

Adjusting your chainsaw’s chain tension requires just a couple of essential tools. Use a flat screwdriver or a wrench, depending on your model’s tensioning mechanism.

Follow these steps to maintain optimal chain tension:

  1. Safety First: Always turn off your chainsaw before starting any adjustments.
  2. Checking Tension: Lift the chain slightly off the guide bar. It should snap back without excess slack or resistance.
  3. Adjusting the Tension: Hold the bar tip up while turning the tensioning screw:
  • Clockwise to tighten
  • Counterclockwise to loosen

A properly tensioned chain allows for slight hand movement without drooping more than a quarter of the bar thickness.

Correct chain tension prevents issues around the sprocket nose and bar groove. Regularly check and adjust your chain tension to ensure smooth operation and enhance the lifespan of your chainsaw.

Frequently Asked Questions

Is It Okay to Put WD-40 on a Chainsaw Chain?

WD-40 isn’t a good choice for your chainsaw chain. It strips lubrication, leading to wear and tear. Instead, use specialized bar and chain oils designed to provide peak lubrication for your chainsaw’s performance.

How to Properly Maintain a Chainsaw?

To properly maintain your chainsaw, regularly inspect the chain, check tension, and clean the air filter. Don’t forget to lubricate moving parts and replace worn components to guarantee peak performance and safety during use.

Do I Need to Soak a New Chainsaw Chain?

Yes, you should soak a new chainsaw chain in AMSOIL Bar & Chain Oil for 15-30 minutes. This guarantees ideal lubrication, reduces friction, and allows your chain to cut smoothly from the start.

How Long Should a Chainsaw Chain Last Before Sharpening?

A chainsaw chain should last about 2-3 hours of cutting before you sharpen it. Factors like wood type affect this. If you notice smoke or cutting resistance, it’s definitely time to sharpen.

Why This Matters?

Maximize your chainsaw’s performance and ensure your safety with these expert maintenance steps! Covering everything from chain sharpening to vital lubrication, learn the essential chainsaw maintenance tips to maximize tool’s lifespan and avoid costly repairs. Keep your chainsaw running efficiently with high-quality agricultural lubricants from Armor Lubricants, a trusted manufacturer of premium lubricants in UAE, including specialized formulas for agricultural applications.

Can You Mix Synthetic Oil With Regular Oil? Here’s the Truth!

Mixing synthetic oil with regular oil potential dangers and best practices guide

Mixing Synthetic Oil with Regular Oil: What You Need to Know

Running low on oil might lead you to consider mixing synthetic oil with regular oil. Although some believe this approach could save time or hassle, the reality is more complex. While mixing the two types of oil won’t cause immediate damage, doing so might threaten your engine’s long-term health.

Key Considerations Before Mixing Oils

  • Oil Compatibility: Both synthetic and regular oils are compatible in the short term, but mixing can dilute the benefits of synthetic oil.
  • Performance Differences: Synthetic oils often perform better in extreme conditions, providing superior protection and lubrication.
  • Long-term Impact: Regularly mixing oils can degrade the overall quality of lubrication, which might lead to increased wear over time.
  • Manufacturer Recommendations: Always check your vehicle’s manual for manufacturer guidelines on oil types.

Before making a decision, assess the potential consequences of mixing oils on your engine’s performance and longevity. If you’re considering switching to synthetic oil, it’s wise to fully drain the old oil and replace it with a high-quality synthetic oil like those from Armor Lubricants. This practice will maximize the benefits of synthetic oil and maintain engine health.

When it comes to engine care, opting for the best engine oil tailored to your vehicle’s requirements pays off in the long run. Prioritize quality, and your engine will thank you.

Is it Safe to Mix Synthetic Oil with Regular Oil?

Mixing synthetic oil with regular oil might seem like a quick solution, but it can lead to unexpected results.

You need to consider what happens chemically when these oils blend and any potential risks that could arise.

Let’s explore whether this combination is safe for your engine.

What Happens When You Mix Synthetic and Conventional Oil?

Mixing Synthetic and Conventional Oil: What You Should Know

Mixing synthetic and conventional oil is a common scenario for many vehicle owners. Understanding the effects on your engine’s performance is crucial.

When you blend synthetic oil with regular oil, it dilutes the beneficial properties of the synthetic blend. This dilution may weaken advantages such as enhanced protection and improved performance at elevated temperatures.

Despite this dilution, mixing these oils generally remains safe for your engine, and immediate damage is unlikely. However, consider the potential drawbacks. Long-term use of this mixture mightn’t deliver optimal performance or efficiency.

To keep your engine running smoothly:

  • Always consult your owner’s manual for specific guidance.
  • Monitor oil levels regularly and check for any changes in performance.
  • Consider transitioning to fully synthetic oil for maximum benefits.

Keeping your engine in top condition requires informed choices about engine oil types. Relying solely on Armor Lubricants can provide the peace of mind you need for exceptional engine performance.

Are There Risks in Mixing Synthetic Oil with Regular Oil?

Mixing Synthetic and Conventional Oil: What You Need to Know

Blending synthetic oil with conventional oil can sometimes pose risks to your engine. Mixing these oils may dilute the advantages that synthetic oil offers, such as superior protection and longevity.

This dilution often leads to reduced performance and can negatively affect your engine’s efficiency over time. When combining different oil types, the chemical additives can react unpredictably. This unexpected reaction might result in sludge or deposits within the engine.

In the debate of synthetic oil vs. conventional oil, it’s advisable to stick to one type for optimal performance.

If you must mix oils, follow these guidelines:

  • Ensure both oils share the same specifications.
  • Consider the potential impact on engine performance.
  • Limit mixing to avoid frequent changes in oil type.

Frequent oil mixing risks compromising engine health.

What are the Benefits of Synthetic Oil Over Conventional Oil?

When you choose synthetic oil, you’re unlocking benefits that conventional oil just can’t match, especially in extreme conditions.

Its superior formulation allows for better performance, protecting your engine from wear and tear.

Understanding what makes synthetic motor oil different can help you make a more informed decision for your vehicle’s health.

How Does Synthetic Oil Perform in Extreme Conditions?

Synthetic Oil: Unmatched Performance in Extreme Conditions

Synthetic oil excels in extreme conditions, significantly outperforming conventional oil.

  • In cold temperatures, it maintains viscosity, which allows for smooth engine performance.
  • During high heat, synthetic oil resists breakdown, offering superior protection against wear compared to regular oil.

Its enhanced stability ensures reliable performance, whether driving in freezing cold or through sweltering heat.

Synthetic oil features superior lubrication properties that minimize engine friction, which enhances efficiency and fuel economy.

Improved detergents within synthetic oil work to keep your engine clean, further boosting its performance.

If you plan to push your vehicle to its limits, choose Armor Lubricants’ synthetic oil as your top choice for extreme conditions.

What Makes Synthetic Motor Oil Different?

Understanding the Benefits of Synthetic Motor Oil

Synthetic motor oil offers a distinct advantage over conventional oil due to its advanced formulation and performance characteristics. Crafted with a unique blend of base oils and additives, synthetic oil provides superior lubrication and protection for your engine.

Key Advantages of Synthetic Motor Oil:

  • Extreme Temperature Performance: Synthetic oil excels in high and low temperatures, minimizing engine wear and tear.
  • Extended Change Intervals: This oil can handle longer durations between changes. As a result, users experience cost savings over time.
  • Resistance to Breakdown: Synthetic motor oil resists oxidation and sludge buildup more effectively than conventional oil. This quality contributes to a smoother and more efficient engine operation.

If you aim for optimal performance, consider switching to Armor Lubricants’ synthetic oil. It not only offers superior protection but also ensures longevity and efficiency for your vehicle.

When Should You Change to Synthetic Oil?

Thinking about switching to synthetic oil?

You should consider changing your motor oil if you notice signs like increased engine noise or reduced performance.

Also, keep an eye on your oil change intervals, as these can guide you on the right timing for making the switch.

How Often Should You Change Your Motor Oil?

How Often Should You Change Your Motor Oil?

Regular motor oil changes are crucial for keeping your engine running smoothly and extending its life. The frequency of these changes largely depends on whether you use synthetic oil or conventional oil.

  • For conventional oil, change it every 3,000 to 5,000 miles.
  • If you use synthetic oil, you can extend that interval to 7,500 to 10,000 miles.

Changing oil at the right intervals prevents engine wear and maintains overall performance.

When mixing motor oils, refer to the recommendations of all brands involved. A consistent oil change schedule significantly impacts your vehicle’s performance and longevity.

Always consult your owner’s manual for specific guidance tailored to your vehicle.

What Are the Signs That You Need to Switch?

Signs It’s Time to Switch to Synthetic Oil

Is your engine running rough or producing unusual noises? Such symptoms indicate a potential need to transition from regular oil to synthetic oil.

If your oil darkens and becomes sludgy more quickly than usual, a change might be necessary. Regular oil often struggles to meet the demands of your engine, particularly in extreme temperatures or under heavy driving conditions.

Additional warning signs include frequent engine knocking or an increase in friction sounds. Paying attention to these cues can guide you toward making the switch to synthetic oil, which offers superior protection and performance.

Key Signs to Consider Switching:

  • Engine roughness or unusual noises
  • Rapid darkening or sludging of oil
  • Frequent engine knocking
  • Increased friction sounds

Your motor oil plays a critical role in your engine’s health and longevity. Don’t hesitate to opt for Armor Lubricants synthetic oil for enhanced performance.

Can You Mix Synthetic and Conventional Motor Oil?

You might wonder if it’s okay to mix synthetic and conventional motor oil.

While you can top off your oil with a different type in a pinch, it’s important to know how to do it properly to ensure your engine runs smoothly.

Let’s explore the best practices for mixing these oils and what to consider when you’re in a bind.

How to Properly Mix the Two Types of Oil?

How to Effectively Mix Synthetic and Conventional Motor Oil

Mixing synthetic and conventional motor oil often surprises car enthusiasts, yet it serves as a practical solution for topping off your engine.

Here’s how to properly mix the two types:

  1. Check Compatibility: Review your vehicle’s owner manual to confirm that mixing is permissible.
  2. Pour in Equal Amounts: Combine equal parts of synthetic and conventional oil. Remember, synthetic oil typically offers superior performance and protection.
  3. Consider Full Transition: When changing your oil, think about fully transitioning to synthetic. This switch can enhance efficiency, especially for older engines or those with high mileage.
  4. Match Viscosity Grades: Always use oils with the same viscosity grade for optimal performance.

While mixing is acceptable, using one oil type consistently yields better long-term results.

Prioritize the benefits of synthetic options, such as improved engine protection and efficiency.

Is it Okay to Top Off Your Oil with Different Types?

Can You Top Off Your Oil with Different Types?

When topping off your oil, you may wonder if mixing synthetic and conventional motor oil is acceptable. The short answer is yes, you can mix them in a pinch.

However, mixing isn’t ideal for long-term use as it can reduce the advantages of using synthetic oil.

Many people worry that mixing oils will lead to catastrophic engine failure. That myth is unfounded. If you only have conventional oil available, feel free to use it for topping off.

Just plan to switch back to synthetic oil during your next oil change for optimal engine performance.

Key Points to Consider:

  • Mixing synthetic and conventional oils can reduce the benefits of synthetic oil.
  • The mix won’t cause major engine damage.
  • Always try to use synthetic oil again at your next oil change.

This approach helps maintain the health and efficiency of your engine while ensuring that you’re using the best products available.

What Should You Consider When Selecting the Right Motor Oil?

When it comes to choosing the right motor oil, you need to consider whether synthetic or regular oil best suits your needs.

Check your car’s manual for the recommended oil type, as it can significantly impact performance and longevity.

Understanding the differences between synthetic and conventional motor oil types can help you make an informed decision.

How to Decide Between Synthetic and Regular Oil?

Choosing Between Synthetic and Regular Oil: A Guide

Selecting the right motor oil can feel overwhelming, especially if you’re not sure about the differences. Keep these key factors in mind to make an informed decision:

  • Vehicle Requirements: Check your owner’s manual to see what type of oil your vehicle needs.
  • Climate: Extreme temperatures can affect oil performance. Synthetic oil performs better in both hot and cold conditions.
  • Driving Habits: If you often drive in harsh conditions, synthetic oil offers superior protection and longevity.

If your vehicle runs well on regular oil and you want a budget-friendly option, conventional oil may be sufficient. It’s crucial to avoid mixing synthetic and regular oil, as this practice can diminish the benefits of either type.

Assess your needs and preferences carefully before making an oil change decision. By focusing on your circumstances, you can choose the motor oil that best suits your vehicle and driving style.

What is the Recommended Oil Type for Your Car?

Choosing the right motor oil for your vehicle significantly influences its performance and durability. To find the best high mileage oil, consult your owner’s manual for the recommended type and viscosity tailored to your engine’s needs.

Consider the advantages of synthetic oil for enhanced protection, particularly if you navigate extreme driving conditions. Synthetic oil can also help extend your intervals between changes.

Older engines or those with less rigorous demands may thrive on conventional oil, which can be a suitable option.

When mixing oils, verify their compatibility to prevent potential problems. Pay close attention to your oil change schedule based on manufacturer recommendations. Adhering to these guidelines helps maintain optimal engine health.

Choosing the right motor oil not only protects your investment but also improves your overall driving experience.

Recommended Motor Oils

  • Synthetic Oil: Superior protection and longevity. Ideal for extreme conditions.
  • Conventional Oil: Suitable for older engines with moderate performance needs.
  • High Mileage Oil: Formulated for vehicles with over 75,000 miles to reduce leaks and improve overall engine health.

Key Takeaways

  • Always check the owner’s manual for specifications.
  • Regularly change your oil to avoid engine issues.
  • Prioritize compatibility when mixing oils.

Protecting your engine starts with selecting the right motor oil. Make a knowledgeable choice to ensure a smoother, more efficient drive.

What are Common Myths About Mixing Synthetic and Conventional Oil?

You might’ve heard that mixing synthetic and conventional oil is always a bad idea, but that’s not necessarily true.

Many misconceptions surround this topic, leading to confusion among car owners. Let’s clear up some of these common myths so you can make informed decisions about your engine’s oil.

Is it True that Mixing Oil is Always Bad?

Is Mixing Oil Always Bad for Your Engine?

Car owners often worry about the effects of mixing synthetic and conventional oil. The common belief claims it can lead to engine issues, but the reality is more complex.

You can mix synthetic and non-synthetic oils effectively. However, understanding the performance and additive differences is crucial.

Here’s why mixing oils can be acceptable:

  • Blending Effectively: Both synthetic and conventional oils can mix without causing immediate harm.
  • Performance Differences: Synthetic oil generally provides superior protection and longevity compared to regular oil.

In an emergency, topping off with a mixed oil is perfectly fine. However, transition back to a full synthetic option as soon as possible for optimal performance.

Maintaining consistency in your oil type is essential for the health of your engine. Focus on using Armor Lubricants to keep your vehicle running smoothly and efficiently.

What are the Most Common Misconceptions?

Common Misconceptions about Mixing Synthetic and Conventional Oil

Many car owners hold misconceptions about mixing synthetic and conventional oil, often fueled by myths that cause unnecessary worry.

One prevalent myth suggests that mixing synthetic oil with regular oil will immediately damage an engine. In reality, while mixing the two isn’t ideal for long-term use, it’s generally safe.

Some believe that oil changes take longer with synthetic oil. Actually, synthetic oils offer longer intervals between changes due to their enhanced stability.

Another common belief is that conventional and synthetic oils can’t coexist without sacrificing performance. This isn’t true; they can work together effectively in a pinch.

Understanding these misconceptions can reduce stress and empower you to make informed decisions about your vehicle’s maintenance.

Conclusion

Mixing synthetic oil with regular oil may seem convenient in a pinch, but it’s not the best choice for your engine. Doing so can dilute the synthetic oil’s benefits and potentially lead to engine problems over time.

If you want to keep your engine running smoothly, follow these tips:

  • Stick to one type of oil.
  • Transition back to synthetic oil at your next oil change.

Your vehicle deserves optimal care, so prioritize the best maintenance practices. Don’t compromise on the health of your engine—choose the right oil for superior performance.

API SN PLUS Oils: The Latest Oil Standard for Engine Lubricants Explained

armor api sn plus oils for maximum engine performance

If you’re driving a modern gasoline engine, you might want to contemplate how oil standards affect your vehicle’s performance. API SN PLUS is the latest advancement, tailored particularly for turbocharged direct injection engines, enhancing protection and efficiency. But what exactly sets it apart from the earlier API SN standard? Understanding these differences could greatly impact your engine’s longevity and fuel economy. Let’s explore the benefits and implications of this new standard for your vehicle.

What is API SN PLUS and how does it differ from API SN?

API SN PLUS is an upgraded oil standard particularly created for turbocharged gasoline direct injection engines, offering improved protection against low-speed pre-ignition.

You’ll find it features extra testing requirements and a modified formulation that sets it apart from the previous API SN standard.

Understanding the API SN PLUS Specification

As automotive technology continues to evolve, understanding the API SN PLUS specification becomes increasingly important for vehicle owners, especially those with modern turbocharged gasoline direct injection (TGDI) engines.

This standard focuses on enhancing engine protection against low-speed pre-ignition (LSPI) issues, which aren’t covered by API SN.

Here are key differences and benefits you should know:

  • API SN PLUS includes the API Sequence IX test for LSPI control.
  • It requires motor oils with higher magnesium content and lower calcium content.
  • API SN PLUS is fully compatible with API SN.
  • It’s designed particularly for turbocharged gasoline engines.
  • The specification was released on May 1, 2018, to meet higher performance demands.

Understanding these points helps you choose the right motor oils for peak engine performance.

Key Improvements Over API SN

Although both the API SN and API SN PLUS standards serve to protect your engine, the latter introduces significant improvements particularly aimed at tackling low-speed pre-ignition (LSPI) in turbocharged gasoline direct injection (TGDI) engines.

The API SN PLUS standard incorporates additional testing through the API Sequence IX test, which particularly addresses LSPI, a concern not fully addressed in the API SN standard.

Formulations meeting the API SN PLUS specifications utilize higher magnesium content and lower calcium levels in their detergent additives, enhancing oil robustness against LSPI incidents.

Furthermore, API SN PLUS is fully backwards compatible with API SN, ensuring that you can safely use oils compliant with the new standard in vehicles that require API SN without worry.

Why Choose API SN PLUS for Your Engine?

When considering engine oil, API SN PLUS stands out as a robust choice for modern vehicles, particularly those equipped with turbocharged gasoline direct injection (TGDI) engines.

Here’s why you should choose API SN PLUS for your engine:

  • Provides improved protection against low-speed pre-ignition (LSPI)
  • Addresses specific combustion challenges in TGDI engines
  • Utilizes modified formulations with higher magnesium content for better performance
  • Fully backward compatible with API SN, ensuring seamless integration
  • Certified by notable brands like Pennzoil and TotalEnergies for reliability

How does API SN PLUS benefit modern gasoline engines?

API SN PLUS offers significant benefits for modern gasoline engines, especially those equipped with turbocharged gasoline direct injection (TGDI) systems.

You’ll notice improved wear protection, improved fuel efficiency, and a drastic reduction in low-speed pre-ignition (LSPI) incidents.

These features contribute to better overall engine performance and longevity, making API SN PLUS Oils a smart choice for your vehicle.

Enhanced Wear Protection for Turbocharged Gasoline Engines

As modern gasoline engines evolve, especially turbocharged gasoline direct injection (TGDI) models, they face unique challenges that demand advanced solutions. API SN PLUS addresses these concerns through improved wear protection, greatly benefiting your engine.

Here’s how it enhances turbocharged gasoline engines:

  • Combat Low-Speed Pre-Ignition (LSPI) to prevent severe damage
  • Higher magnesium levels reduce LSPI risk as well as improving engine performance
  • Refined lubricant requirements tailored for high pressures and temperatures
  • Prolongs engine life by mitigating wear and tear
  • Guarantees compliance with modern lubrication standards for reliability

With API SN PLUS, you can trust in the added protection and longevity of your turbocharged engine. This assures it runs at peak performance even under demanding conditions.

Fuel Efficiency Improvements with API SN PLUS

Fuel efficiency is a crucial concern for drivers looking to maximize performance along with minimizing costs.

API SN PLUS motor oils are specially formulated to improve fuel efficiency in modern gasoline engines, especially turbocharged gasoline direct injection (TGDI) engines. By enhancing lubrication properties, these oils reduce friction, leading to better engine performance and significant impacts on fuel economy.

The rigorous testing for LSPI guarantees stable combustion, optimizing combustion efficiency and overall energy use. As automakers aim for improved fuel economy and emissions compliance, adopting API SN PLUS oils helps meet these goals.

You can drive with confidence, knowing that your engine operates effectively during contributing to a greener environment and lower fuel costs.

Impact on Low-Speed Pre-Ignition (LSPI)

Though many modern gasoline engines deliver impressive performance, they furthermore face challenges like Low-Speed Pre-Ignition (LSPI), which can lead to severe engine damage.

API SN PLUS directly addresses these issues, especially in turbocharged gasoline direct injection engines. By incorporating advanced formulations, it greatly improves engine protection and reduces LSPI incidents.

  • Prevents premature combustion events
  • Guarantees higher magnesium content in motor oils
  • Lowers occurrence of catastrophic engine failures
  • Improves overall engine efficiency
  • Meets rigorous testing standards for high-load conditions

With over 25% of new U.S. cars affected by LSPI, switching to API SN PLUS is a proactive way to maintain engine reliability and performance, making it a crucial choice for modern gasoline engines.

What are the viscosity grades available for API SN PLUS oils?

When it comes to API SN PLUS oils, you’ll find several viscosity grades like SAE 0W-20, 5W-20, 5W-30, and 10W-30.

Choosing the right viscosity for your vehicle is essential since it directly impacts engine performance and protection against wear.

Let’s explore how these grades can meet the needs of various engines, especially turbocharged gasoline direct injection types.

Common Viscosity Ratings: 5W-30 and More

API SN PLUS oils come in several common viscosity grades, including SAE 0W-20, 5W-20, 5W-30, and 10W-30, each tailored to meet specific engine needs.

The 5W-30 viscosity grade is particularly popular for modern vehicles, offering excellent engine protection along with adaptability to varying temperatures.

Here’s a quick breakdown of these viscosity grades:

  • SAE 0W-20: Ideal for new engines and fuel-efficient models.
  • SAE 5W-20: Balances fuel economy and engine protection.
  • SAE 5W-30: Provides peak protection, especially for turbocharged engines.
  • SAE 10W-30: Suitable for warm climates and high-performance needs.
  • Synthetic motor oil: Improves overall performance and longevity.

Choose the viscosity grade that best meets your engine’s requirements for maximum efficiency and protection.

Choosing the Right Oil Viscosity for Your Vehicle

How do you choose the right oil viscosity for your vehicle? Start by looking at the recommended viscosity grades found in your owner’s manual.

API SN PLUS oils come in several SAE grades, including 0W-20, 5W-20, 5W-30, and 10W-30, each tailored to specific engine requirements. The “0W” indicates excellent low-temperature performance, whereas higher numbers provide better high-temperature stability.

Picking the correct oil viscosity is vital for optimizing engine performance and ensuring compatibility with your engine’s design. Thicker oils, during high temperatures, can reduce fuel economy. This is particularly important in turbocharged engines, where preventing low-speed pre-ignition (LSPI) is critical.

Regular oil changes using the right viscosity improve your vehicle’s longevity.

How Viscosity Affects Engine Performance

Selecting the right oil viscosity can considerably impact your engine’s performance. Understanding the available viscosity grades for API SN PLUS oils helps guarantee peak engine protection and fuel economy, especially for turbocharged direct injection systems.

Here are the grades you can choose from:

  • SAE 0W-20
  • SAE 5W-20
  • SAE 5W-30
  • SAE 10W-30

These grades influence engine start-up efficiency in cold weather and maintain oil performance at high temperatures.

The first number indicates viscosity during low temperatures, promoting easier start-ups, whereas the second number represents how the oil behaves during peak operation, essential for preventing LSPI incidents.

Choosing the right viscosity improves overall engine performance and longevity.

What is the significance of the API Service Categories?

The API Service Categories are essential for understanding how well an oil will protect your engine. By checking the API certification mark on containers, you can quickly determine if the oil meets the necessary standards for your vehicle.

Knowing the differences between categories like API SP and SN PLUS helps you make informed choices for peak engine performance.

Understanding API Service Symbols: Donut and Starburst

While choosing the right engine oil can feel intimidating, understanding the API Service Symbols—commonly referred to as the Donut and Starburst—makes it much easier.

These symbols provide essential information about engine oil performance and its adherence to API standards. When selecting oil, look for:

  • The Donut, which categorizes the oil’s service level (e.g., API SN PLUS) and whether it’s resource-conserving.
  • The Starburst certification mark, confirming compliance with the latest performance requirements.
  • Assurance that both symbols indicate independent testing and certification.
  • Indication of engine protection standards met by the oil.
  • Guidance for choosing the right lubricant for high-performance or specialized engines.

With the Donut and Starburst, you can confidently pick the best oil for your vehicle!

How to Read the API Certification Mark on Oil Containers

Understanding the API Certification Mark on oil containers is crucial for choosing the right lubricant for your engine. The mark, known as the “starburst,” assures you that the oil meets performance standards set by the American Petroleum Institute. Within the API service symbol, or “donut,” you’ll find important information about engine performance capabilities and applications like Low-Speed Pre-Ignition (LSPI) protection for turbocharged gasoline direct injection engines. Oils bearing the API SN PLUS label have passed rigorous testing, ensuring greater protection against LSPI incidents and highlighting their resource-conserving features. To help you, here’s a summary table:

Mark Type Description Related Affiliate Marketing
 Starburst Assures oil meets API standards Quality assurance for consumers
 API Service Displays service categories like SN PLUS Indicates performance capabilities
 Resource-Conserving Defines eco-friendly oil options Improves fuel efficiency
 Synthetic Engine Oil Boosts engine longevity Provides superior protection
 LSPI Protection Targets issues in TGDI engines Reduces risk of damage

API SP vs. SN PLUS: What You Need to Know

When you’re choosing engine oil, it’s vital to know the differences between API SP and API SN PLUS, as they reflect significant advancements in lubrication technology.

Here’s what you should understand about these engine oil standards:

  • API SP: Newer, addresses wear protection, fuel economy, and emissions control.
  • API SN PLUS: Specifically tackles LSPI issues in turbocharged gasoline direct injection engines.
  • Backward Compatible: Both standards can be used in older vehicles meeting API SN criteria.
  • Advanced Technologies: API SP incorporates developments that improve performance and longevity.
  • Testing Requirements: API SN PLUS includes specialized tests for LSPI mitigation, making it critical for high-performance engines.

Choosing the right oil standard means better engine protection and overall vehicle performance.

How does ILSAC GF-6 relate to API SN PLUS?

When you think about ILSAC GF-6, it’s important to see how it complements API SN PLUS.

Both standards focus on enhancing engine protection during being compatible with each other, ensuring your engine runs smoothly.

Understanding the role of base oils and the advancements in lubrication technology can help you make informed choices for your vehicle.

Overview of ILSAC Standards for Engine Oils

The ILSAC GF-6 standards represent a significant advancement in engine oil technology, closely aligned with the goals of API SN PLUS. These standards focus on boosting engine protection and performance, particularly for Turbocharged Gasoline Direct Injection (TGDI) systems.

Here are key features of ILSAC GF-6:

  • Focus on low-speed pre-ignition (LSPI) prevention
  • Categories GF-6A and GF-6B aimed at improving fuel economy
  • Incorporation of additional stringent performance tests
  • Enhanced engine cleanliness and reduced wear
  • Development in response to the evolving needs of modern engines

Both API SN PLUS and ILSAC GF-6 emphasize improved engine oils, ensuring your engine runs efficiently and lasts longer. Choosing the right standard elevates overall performance and protection for your vehicle.

Compatibility of API SN PLUS with ILSAC GF-6

API SN PLUS and ILSAC GF-6 share a common goal of enhancing engine performance and protection, particularly for modern engines facing the challenges of turbocharged gasoline direct injection.

API SN PLUS addresses Low-Speed Pre-Ignition (LSPI) in these engines, whereas ILSAC GF-6 sets even stricter performance requirements to boost fuel economy and safeguard engine components.

Both standards focus on advanced oil formulations that minimize LSPI risks, guaranteeing peak engine lubrication and protection.

Additionally, API SN PLUS is backward compatible with vehicles requiring API SN oils and can be used alongside ILSAC GF-5 standards.

This compatibility guarantees a seamless changeover as consumers look forward to the benefits of ILSAC GF-6 in enhancing overall engine performance and longevity.

The Role of Base Oils in API SN PLUS Formulation

In contemplating the advanced requirements of modern engines, it’s crucial to recognize that the base oils in API SN PLUS formulations play a significant role in enhancing performance and protection. See our related post about base oil groups and their applications.

These oils are particularly designed to combat Low-Speed Pre-Ignition (LSPI) during optimizing engine performance. Here’s how they contribute:

  • They meet API SN PLUS specifications, ensuring compatibility with TGDI engines.
  • They incorporate advanced base oil technology for superior lubrication under extreme conditions.
  • They harmonize with additive packages to reduce LSPI incidents.
  • They include stable synthetic oil blends, improving fuel efficiency and reducing emissions.
  • They align with ILSAC GF-6 standards, promoting better engine protection and longevity.

When should you consider switching to API SN PLUS motor oil?

If you notice signs that your engine needs an oil change, it’s worth considering an upgrade to API SN PLUS motor oil.

This oil standard offers significant benefits, especially for modern engines, ensuring better protection and performance.

Plus, using API SN PLUS can have long-term positive effects on your engine’s health.

Signs That Your Engine Needs an Oil Change

Noticing signs of engine trouble can be a crucial indicator that it’s time for an oil change.

Keeping an eye on these signs could save your engine from damage and boost fuel efficiency.

Consider switching to API SN PLUS oil for your vehicle if you notice:

  • Engine knocking or pinging, which may indicate low-speed pre-ignition (LSPI)
  • A sudden drop in engine performance or reduced fuel efficiency
  • An illuminated oil pressure warning light suggesting low oil quality
  • Unusual engine vibrations or noticeable exhaust smoke
  • Your vehicle’s owner’s manual recommends API SN PLUS, especially for turbocharged engines

Acting on these signs can provide improved protection for your engine and help prevent costly repairs down the road.

Benefits of Upgrading to the Latest Oil Standard

Upgrading to API SN PLUS motor oil can greatly benefit your turbocharged engine, especially when aiming to prevent issues like Low-Speed Pre-Ignition (LSPI). This latest oil standard is particularly designed for turbocharged gasoline direct injection (TGDI) engines, addressing modern engine demands. By making the switch, you improve engine performance and longevity as you reduce the risk of damage.

Feature API SN Plus Conventional Oils
 LSPI Mitigation Yes No
 Additional Testing Thorough for LSPI Limited
 Engine Protection Superior Standard
 Compatibility with API SN Fully compatible Varies

Don’t wait until issues arise; consider upgrading to API SN PLUS for reliable engine health and performance.

Long-Term Effects of Using API SN PLUS

When it comes to maintaining the health of your turbocharged gasoline direct injection (TGDI) engine, switching to API SN PLUS motor oil can play an essential role in preventing long-term issues.

Here’s why you should consider making the switch:

  • Mitigates risks of low-speed pre-ignition (LSPI), reducing potential engine damage.
  • Improves engine life with higher magnesium content to combat LSPI occurrences.
  • Recommended for vehicles manufactured after May 1, 2018, aligning with updated specifications.
  • Increases fuel efficiency because of its advanced formulation tailored for modern engines.
  • Boosts overall engine performance, ensuring stability under high-pressure conditions.

Frequently Asked Questions

Ques: What Is API SN in Engine Oils?

Ans: API SN is a motor oil specification from the American Petroleum Institute that guarantees engine protection and performance for modern gasoline engines. It addresses wear, deposits, oxidation stability, and maintains compatibility with older oil specifications.

Ques: Which Is Better, SL or SN Oil?

Ans: When choosing between SL and SN oil, you’ll find SN oil offers better protection, improved fuel economy, and lower emissions. It’s designed for modern engines, making it the superior choice for performance and longevity.

Ques: What Is the Difference Between API and SAE Oil?

Ans: API oil ratings assess performance characteristics of motor oils, whereas SAE classifications focus on viscosity and temperature handling. Knowing both helps you choose the best oil for your engine’s needs, ensuring ideal performance and protection.

Ques: Which API Is Best for Engine Oil?

Ans: To choose the best API for engine oil, consider your vehicle type and driving conditions. Typically, API SN Plus is ideal for modern turbocharged engines, ensuring improved protection against low-speed pre-ignition and promoting engine longevity.

Conclusion

To summarize, switching to API SN PLUS motor oil can greatly improve your engine’s performance, especially if you own a modern turbocharged gasoline direct injection vehicle. Its advanced formulation offers better protection against low-speed pre-ignition and boosts fuel efficiency, aligning with today’s automotive demands. Don’t overlook the benefits—upgrading to this latest oil standard can help you maintain your engine’s health and longevity, keeping your vehicle running smoothly for years to come.

Looking for premium engine protection? Armor Lubricants offers a range of high-performance engine oils in the UAE, including those meeting the advanced API SN PLUS specification. Our Engine oils are designed for exceptional wear protection, improved fuel economy, and engine longevity. Explore our full range of engine oils and find the perfect match for your vehicle’s needs. Your trusted source for Fully Synthetic Engine Oil API SN PLUS for ultimate engine care.product

Does the Brands of Motor Oil Really Matter?

truth about brands of motor oil quality and impacts on engine performance

Yes, Brands of motor oil matter! But no more expensive are not always the best! 

What is the Difference Between Motor Oil Brands?

Engine oil is just a blend of base oil and additives, so all brands are the same. If this is what you think, it is my duty to tell you how wroooong you are! 

Engine oil may seem like a simple mixture, but the differences between brands are significant. Each manufacturer uses unique formulations of base oils and additive packages. You already know how there are three types of base oils but let me tell you there are more! a lot more

Quality of engine oil, and its performance are affected by the choice of raw materials, refining processes, and proprietary technologies. Two base oils from the base group could vary in properties because many factors like Molecular Structure Differences can influence how oil react in the engine. 

Viscosity stability is another key difference. Premium brands invest in high-quality viscosity modifiers that maintain optimal oil flow in both cold starts and high-heat conditions. Lower-quality oils may break down faster, leading to sludge buildup, poor lubrication, and increased engine wear.

Certifications and approvals further separate top-tier brands from lower-quality options. Leading oil manufacturers undergo rigorous testing to meet industry standards set by organizations like API, ACEA, and OEMs.

Industry standards like API and ACEA are strict, but some Automakers set even stricter standards which clarifies how hard can it be to be OEM certified. 

“Difference lies in the details”

Small details are what sets brands from each others. Some brands are satisfied with regular quality, while others aim for nearly perfect quality. and this is something you need to remember next time you try to say all brands are the same! 

How Does Brands Affect Motor Oil Performance?

We use engine to lubricate the engine right? NOO

Engine oil does more than just lubricate. Here is what this liquid starts doing the moment your engine starts:

  1. Lubrication – Fills every tiny gap between engine’s parts.
  2. Coolingabsorbs heat generated by engine operation then takes it to oil cooler.
  3. Cleaning – attach itself to contaminants like dirt then traps it into the filter.
  4. Corrosion Protection – Prevents rust and corrosion by forming a protective barrier on metal surfaces.
  5. Sealing – Enhances the sealing of piston rings and cylinder walls.
  6. Shock Absorption – Cushions engine components from mechanical shock and vibrations.
  7. Preventing Oxidation – Includes antioxidants to resist oil degradation.
  8. Reducing Foaming – Contains anti-foaming agents to prevent bubbles.

Precise formula manufactured using advanced technology is key to ensure each task is performed perfectly. Achieving such goal requires experienced team, with the latest devises and technology. 

Having a device to inspect the percentage of additives. Using automated blending, in special tanks, and every single detail can make a difference in the quality. 

Quality Vs Price  

“You get what you pay for”

I’ve always loved this saying, because it represents the value of products and exposes how cheap alternatives can be bad for you. Unfortunately, some people thinks it means they should only premium international brands to get better quality which is not true!

Brands can increase prices up to 40% and still have high demands. Why? because they are relying on trust and reputation. 

Can you find the same product quality but cheaper? Sure you can, but bear in mind, that differences in pricing should be reasonable otherwise you are getting different quality.   

How Is Motor Oil Quality Affected?

The quality of motor oil depends on its formulation. Manufacturers use different base oils and additive packages, which directly impact performance. Several factors determine how well an oil protects an engine:

  • Base Oil Type – Synthetic or mineral, what group of base oil?
  • Additive Package – what is the source of additives? what are their purposes? 
  • Viscosity Stability – How long does is take for them to break down? 
  • Resistance to Contaminants – how much does the performance drop over time? 

Can You Get Quality Without Overspending?

Lubricants with good value for money are everywhere, but the hard challenge is to find them between many cheap alternatives. It is hard, but luckily there are mechanics, and online reviews

Try asking mechanics you trust for recommendations. Happy customers are easy to spot and mechanics workshops are the right place to do that. your mechanic can help you find good products based on other customers satisfaction for the products. 

Since there are limits to trust, you can look for the products you get recommendation for online, and look for reviews. 

Just remember not to fall for fake reviews, they are not that hard to spot nowadays. 

Is There a Superior Motor Oil Brands?

“Every pot has its lid”

Think of you favorite dish, and ask yourself how many recipes are there to make it? How many people love the same recipe as you and how many prefer different ones? 

This dish is the engine oil to your car, and your taste is the needs each car has. A driver with the same car as you, but drives more frequently might not find the engine oil you use a good fit. 

With that said, it is easy to explain how there is no superior brands of motor oil. it is always relative, because we have different markets. Some manufacturers, focus on price, others on long lifespan, better corrosion resistance etc. 

To get the best performance, always determine your needs! and specify what matters to you the most. are you looking for price? longer intervals? then match them with your car needs and you will have your “LID”

What Makes One Motor Oil Brand Better Than Another?

Here, i will use the word better to imply better performance only. Better performance can be found in certain words written on the bottle and here is how you can find it. 

Base Oil

Base oil make about 70% of the product. It is the basis for performance. For better performance look for

  • Base oil Type – Look for “Fully Synthetic” or at least “Semi-synthetic”
  • Purity – Choose virgin oils and avoid recycled (usually written as RC on the bottle)

Advanced Additives 

Additives is what makes engine oils different. Lubricants manufacturers know how you can reduce cost by using lower quality additives and some of them do that. Here is a Guide to Lubricant Additives

Industry Certifications

Oils must meet API, ACEA specifications. Meeting automaker-specific standards (OEMs) can mean be even better. 

How Can Motor Oil Impact Your Engine’s Longevity?

The right motor oil plays a critical role in keeping an engine running smoothly for years. It lubricates moving parts, reduces friction, and prevents harmful deposits from forming. Poor-quality oil or infrequent changes can lead to premature wear, reducing an engine’s lifespan.

Key Ways Motor Oil Extends Engine Life

  • Reduces friction – Proper lubrication prevents metal components from grinding against each other.
  • Keeps the engine clean – High-quality products contain detergents that prevent sludge buildup.
  • Protects against heat – Premium oils resist thermal breakdown, avoiding damage from extreme temperatures.
  • Prevents corrosion – Additives shield internal components from moisture and contaminants.

Using great motor oil and following recommended change intervals help engines reach high mile counts without major repairs.

Does Using a Premium Brands of Motor Oil Make a Difference?

A premium motor oil brands often includes advanced additives and higher-quality base oils, but does that really make a difference? In many cases, yes—especially for high-performance or high-mileage vehicles.

Advantages of Premium Motor Oil

  • Longer oil life – Fewer changes, reducing maintenance costs over time.
  • Superior engine protectionHigh-quality formulations prevent harm from friction and deposits.
  • Better fuel efficiency – Reduces internal drag, improving overall performance.
  • Consistent viscosity – Performs well in extreme temperatures, preventing wear due to thinning or thickening.

While budget oils may work in the short term, premium motor oil offers long-term benefits that protect an engine for years.

What Are the Risks of Using a Low-Quality Motor Oil Brands?

Choosing a low-quality motor oil may save money upfront, but it often leads to expensive repairs. Inferior formulations lack essential additives, break down faster, and fail to provide the protection engines need.

Potential Risks of Low-Quality Motor Oil

  • Increased engine wear – Poor lubrication causes metal parts to wear down quickly.
  • Sludge buildup – Cheap oils often lack detergents, leading to thick deposits that block oil flow.
  • Higher oil consumption – Inferior base oils evaporate or burn off faster, requiring frequent top-ups.
  • Potential overheating – Weak thermal stability can cause oil breakdown, leading to overheating and internal harm.

Using a little extra money on a great oil prevents major repair costs in the end. A high-quality product protects the engine, improves performance, and extends vehicle longevity.

Is It Worth Spending More on a Well-Known Brands Motor Oil?

The answer depends on the alternative. If the choice is between a reputable brand and a cheap, low-quality oil, then spending more is worth it. Inferior Inferior oil can lead to engine harm, reduced efficiency, and costly repairs over the years, reduced efficiency, and costly repairs over the years.

However, if another brand offers the same quality at a lower price, then there’s little reason to overpay. Many lesser-known products meet industry standards and provide great protection. The key is to consider the specifications, approvals, and performance rather than just the name on the bottle.

Can You Trust Brand Names When It Comes to Motor Oil?

“A good reputation is more valuable than money.”

Publilius Syrus

Reputable brands invest heavily in quality and research to maintain their name in the industry. They understand that cutting corners for short-term profit could lead to customer distrust and long-term losses.

Major motor oil manufacturers follow strict industry standards, ensuring their product meets performance expectations. Harmful shortcuts in formulation would trigger backlash, damaging their reputation. While it’s important to remain informed, well-established brands are generally reliable choices for engine protection.